Pectoralis Minor Length or Posterior Capsule Tightness
How to Perform
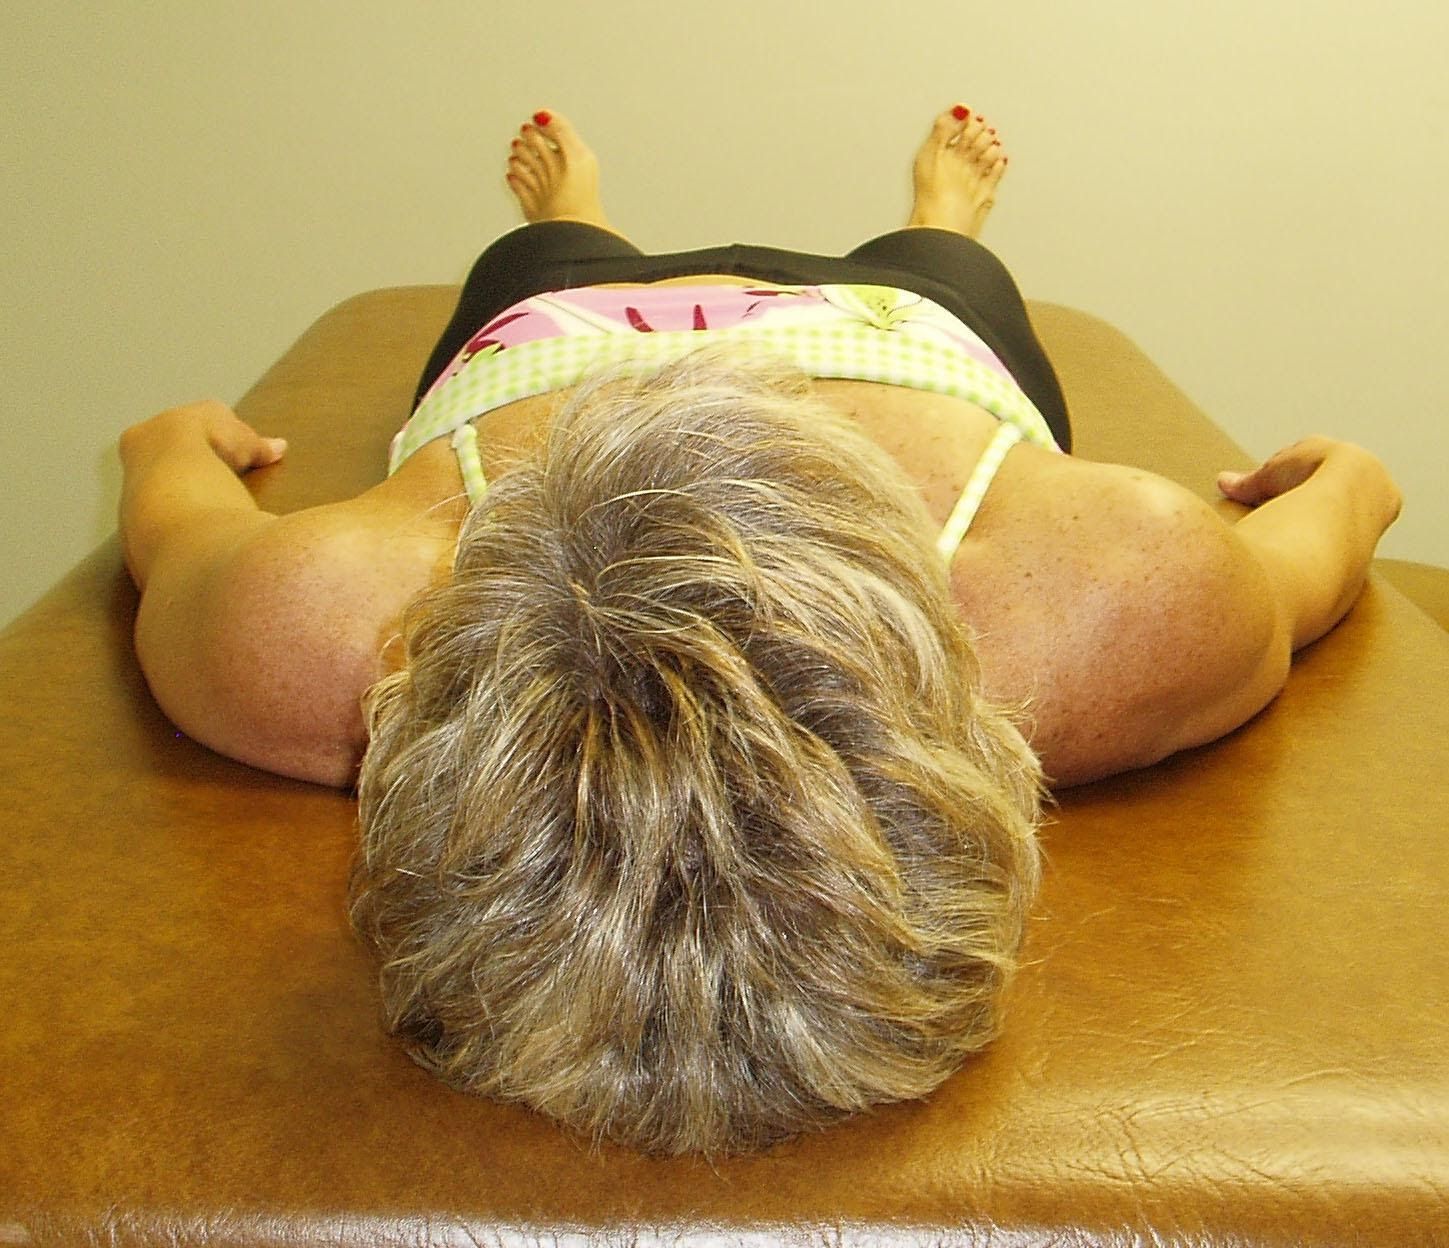
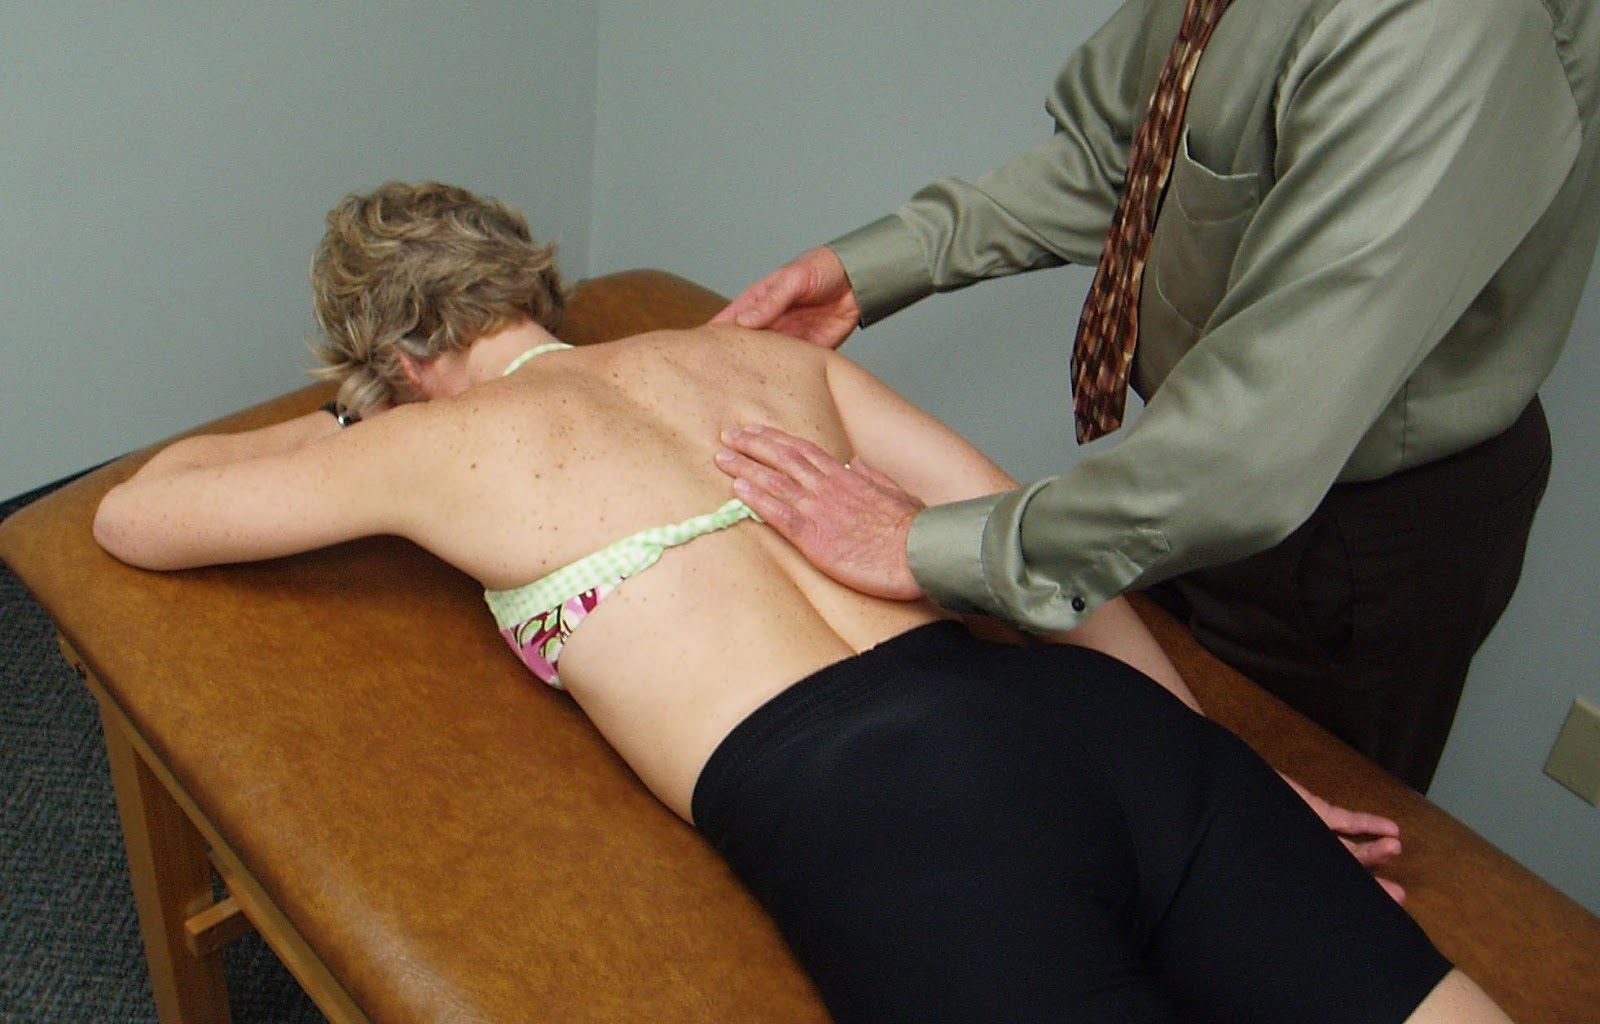
With the patient lying supine and without a pillow under the head, the therapist observes the relative position of both shoulders compared to the table top.
Notice that the right shoulder appears to be more anterior than the left.
Interpretation and the most common dysfunctional patterns seen
When observing that one shoulder appears to be relatively anterior compared to the opposite shoulder the therapist needs to determine the source of this anterior displacement. Is it due to a tight pectoralis minor as originally proposed by Kendall and McCreary, 1983 or due to a tight posterior shoulder capsule on that side, as the treatment for each of these dysfunctions is vastly different.
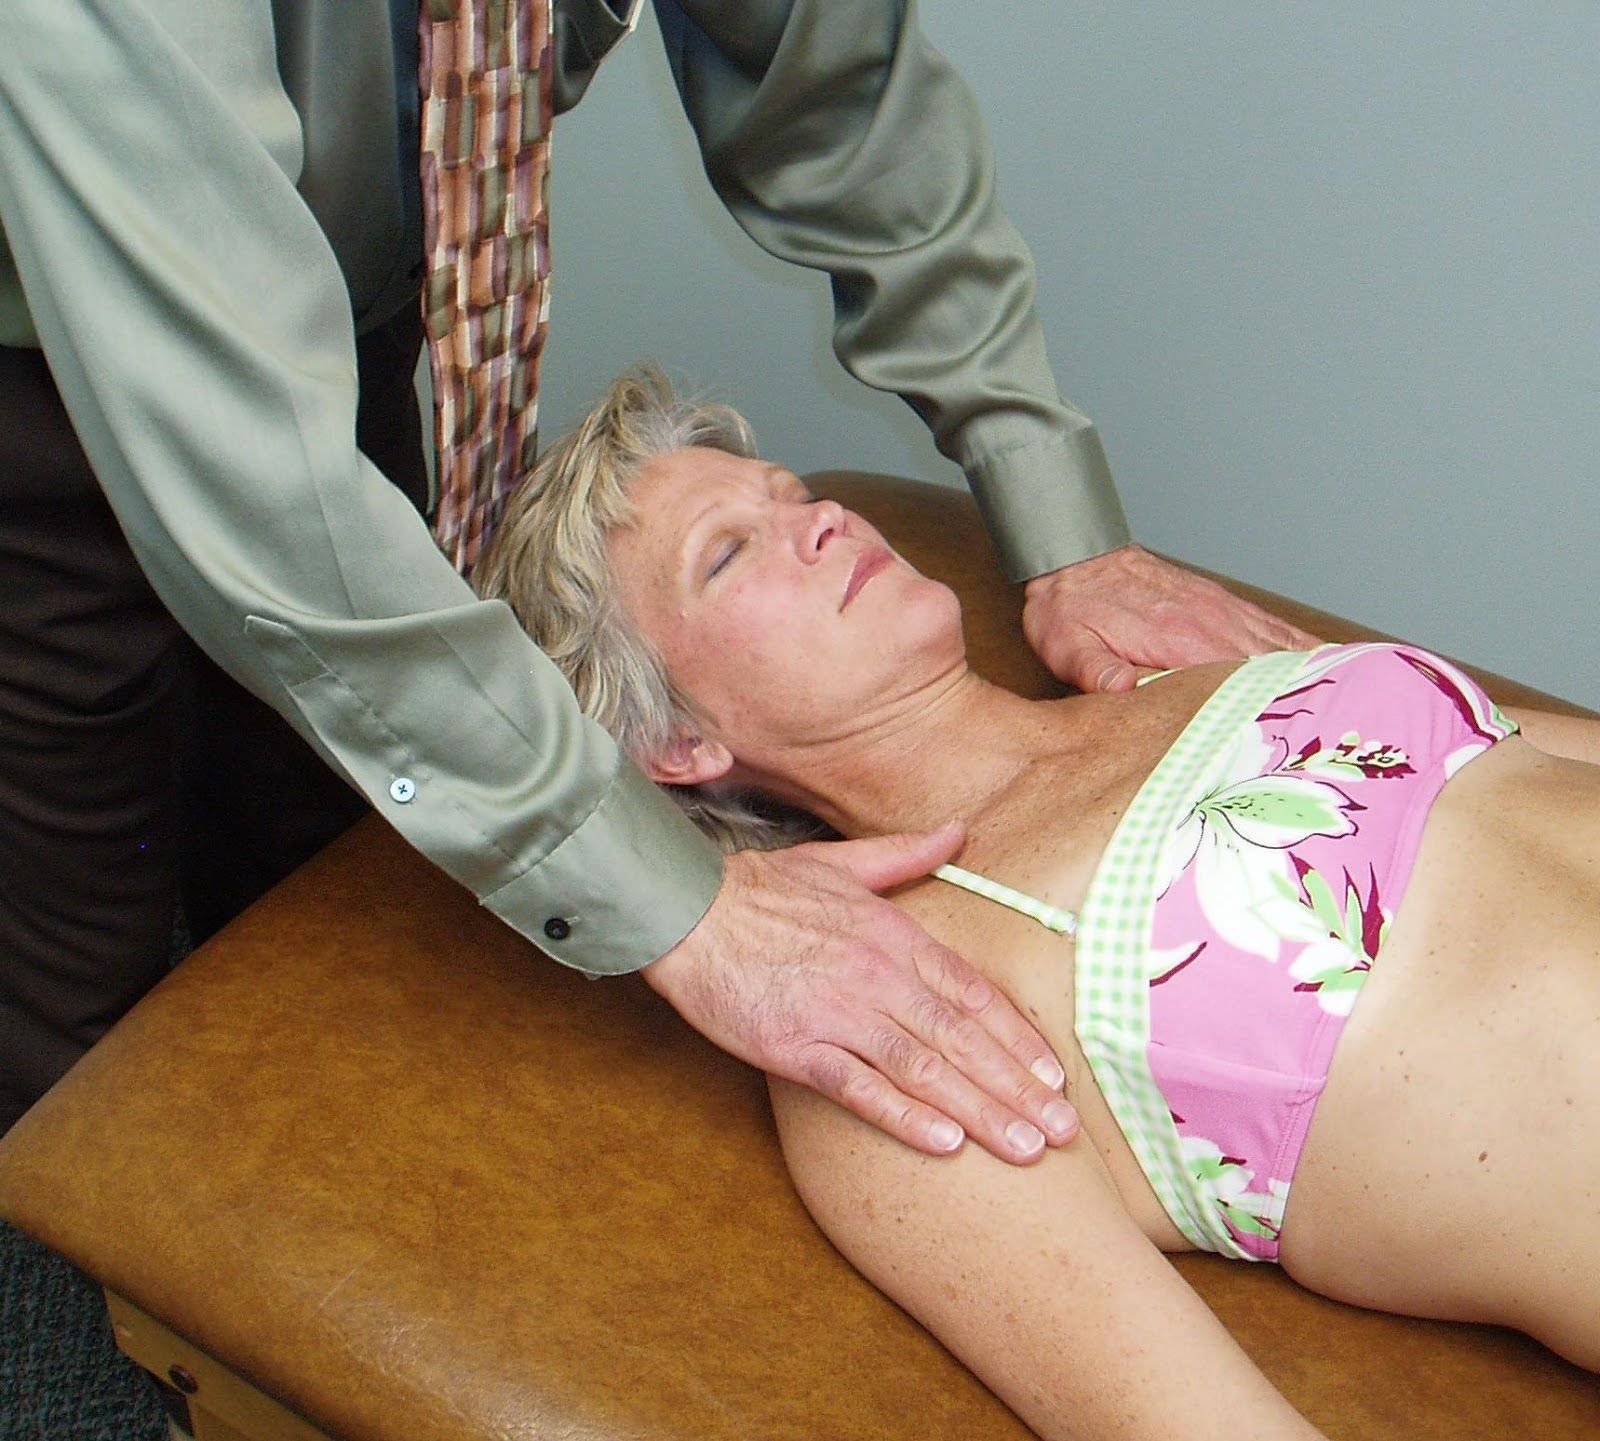
To differentiate between the two, the therapist applies an AP glide to the head of the humerus to confirm posterior capsule tightness on this patient’s right side. Recall that the pectoralis minor does not attach to the humerus so it should not influence or restrict posterior glide.
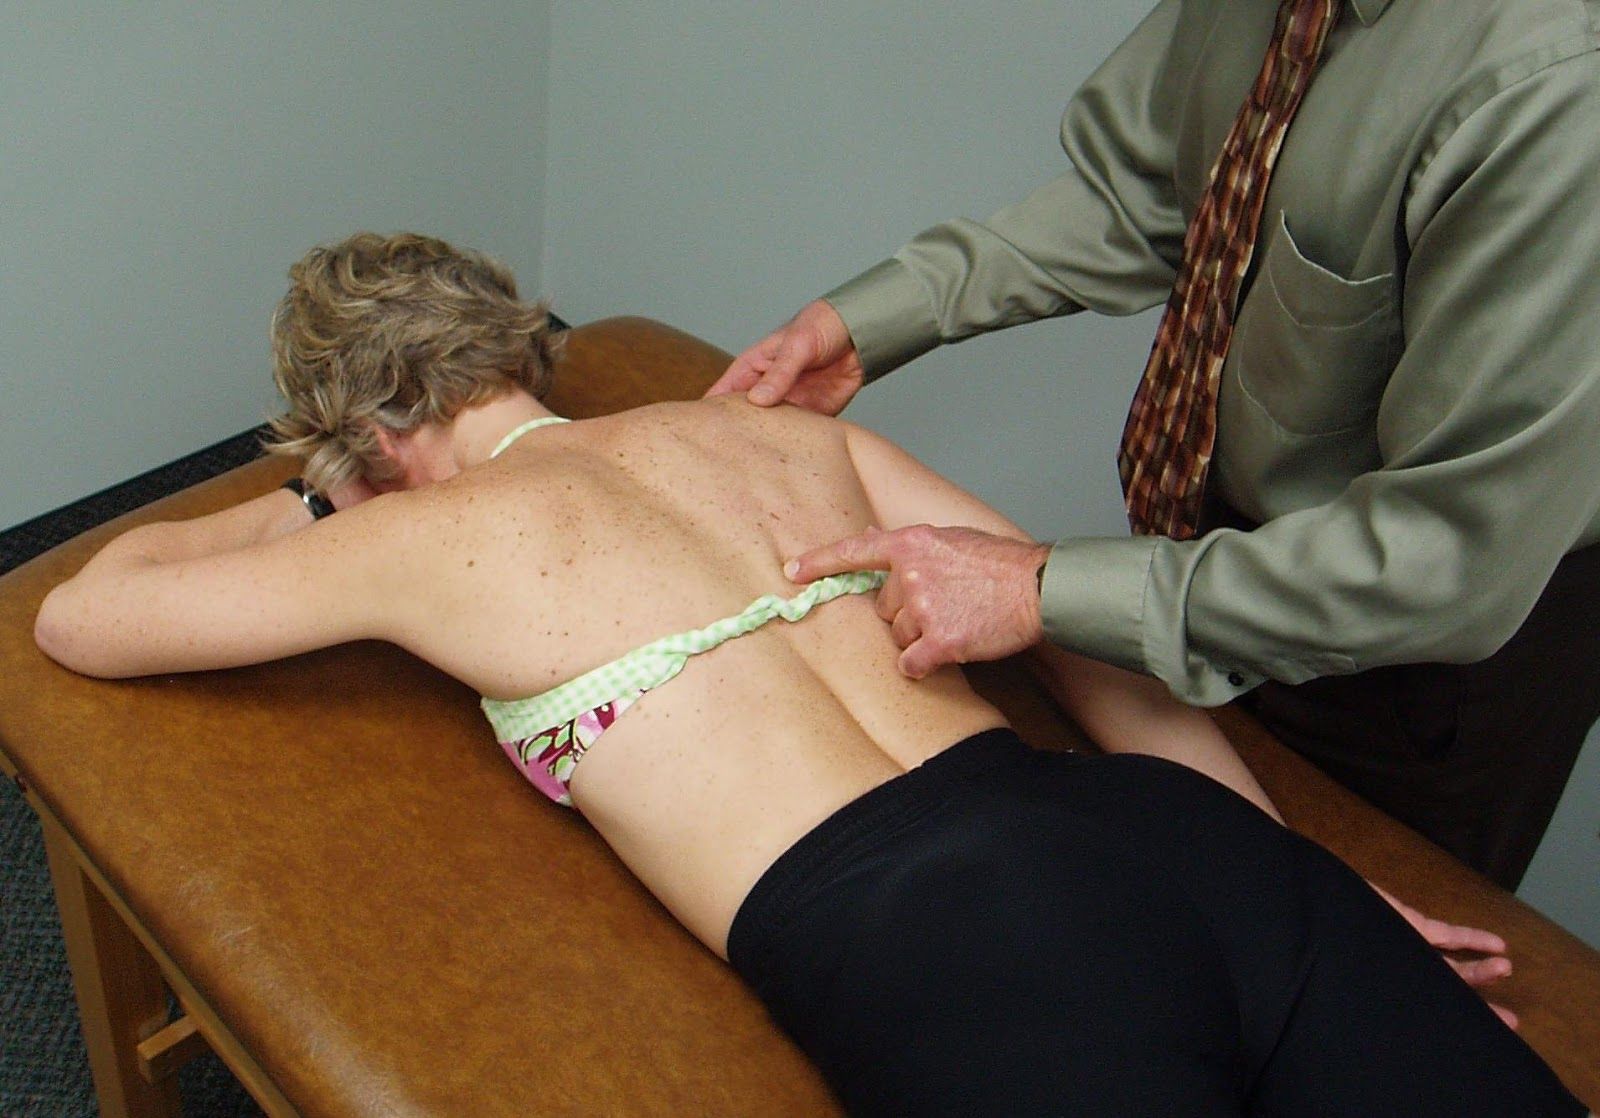
To assess for pectoralis minor hypertonicity as the cause of the anterior displacement the therapist can apply an inferiorly directed force on the anterior 3rd-5th ribs on both sides and note any resistance in extensibility between the two sides.
In this patient a restriction for AP glide of the right shoulder was noted indicating that the tissue involved is the R posterior capsule. Studies have shown that with a tight posterior capsule the head of the humerus is pushed forward and superiorly with a resultant loss of internal rotation mobility. (Harryman et al., 1990; Tyler et al., 1999; Tyler et al., 2000).
To confirm posterior capsule tightness the therapist then examines the range of motion for IR by placing the patient in side lying with the scapula stabilized. The arm is then passively internally rotated.
Scapular Depression Test: A test of lower trapezius strength/recruitment
How to Perform
Scapular Depression: Lower Trapezius Activation
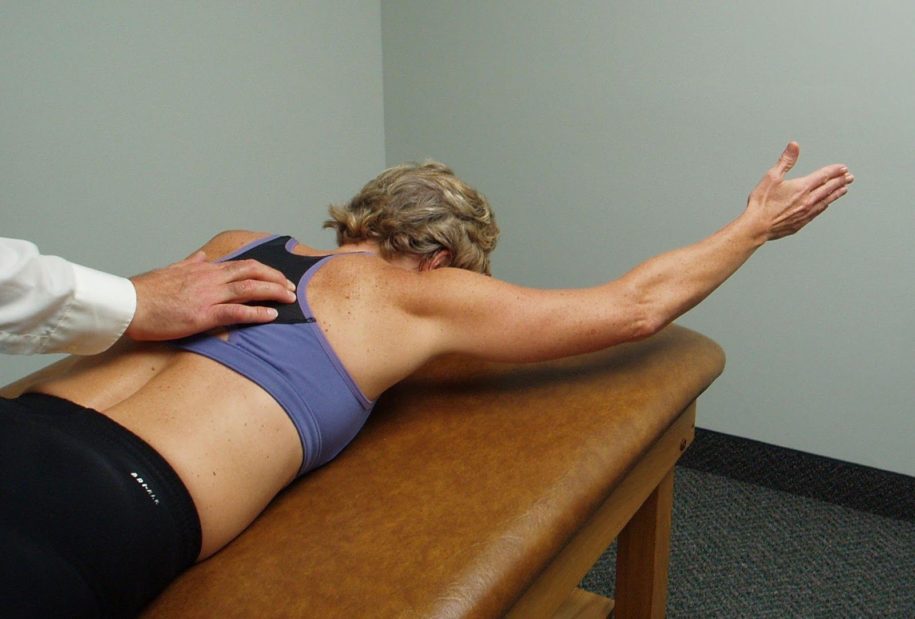
The patient is prone lying with the tested arm overhead and the arm abducted to 140º.
The patient lifts the arm off the table and the therapist palpates the lower trapezius for activation/tone.
An alternative test can be done in prone lying with the tested arm resting at the patient’s side.
The examiner lifts the patient’s shoulder off the table and asks the patient to hold the shoulder blade down and back to activate the lower trapezius.
Lower Trapezius Segmental Assessment:
Therapist palpates for activation of the lower trapezius along its length of attachment from T6-12 and identifies an area where the muscle appears to be inhibited.
Interpretation and the most common dysfunctional patterns seen
The lower trapezius muscle normally contributes to a force couple, along with the serratus anterior, to upwardly rotate, externally rotate and posteriorly tilt the scapula during arm elevation.
Inhibition of the lower trapezius significantly decreases the scapular stability that is needed when raising the arm over the head resulting in elevation of the shoulder and scapular dyskinesis. The net result that often occurs is impingement of the shoulder and/or cervical strain/pain.
When the patient is asked to hold the scapula down and back they often will substitute by using the ipsilateral latissimus dorsi resulting in depression of the shoulder girdle rather than depression of the scapula. Overutilization of the latissimus dorsi also results in downward rather than upward rotation of the scapula.
Often a specific thoracic segmental level of inhibition can be identified by palpating along the length of the lower trapezius attachment to the spine from T6-12. It should be noted that the lower trapezius muscle not only receives its innervation from the spinal accessory nerve (Cranial Nerve 11) and C3,4, but we also believe it’s segmentally innervated by the dorsal primary rami found at each thoracic spinal segment to which the lower trapezius is attached.
Note that the lower trapezius not only contributes to mobility of the shoulder, but is also a thoracic spinal extensor. Consequently, studies have found that both mobilization and manipulation techniques to increase extension in the thoracic spine result in an increase in lower trapezius muscle strength, at least in the short term (Liebler et al., 2001 and Cleland et al., 2004). Clinically what we have found is that an FRS R dysfunction found anywhere from T6 thru T10 results in lower trapezius inhibition at the same segmental level as the FRS. Thus restoration of thoracic extension mobility and especially treating FRS dysfunctions needs to occur first before any attempt to “strengthen” the lower trapezius muscle is initiated.
Scapular Stabilization Test: A test of serratus anterior and lower trapezius strength
How to Perform
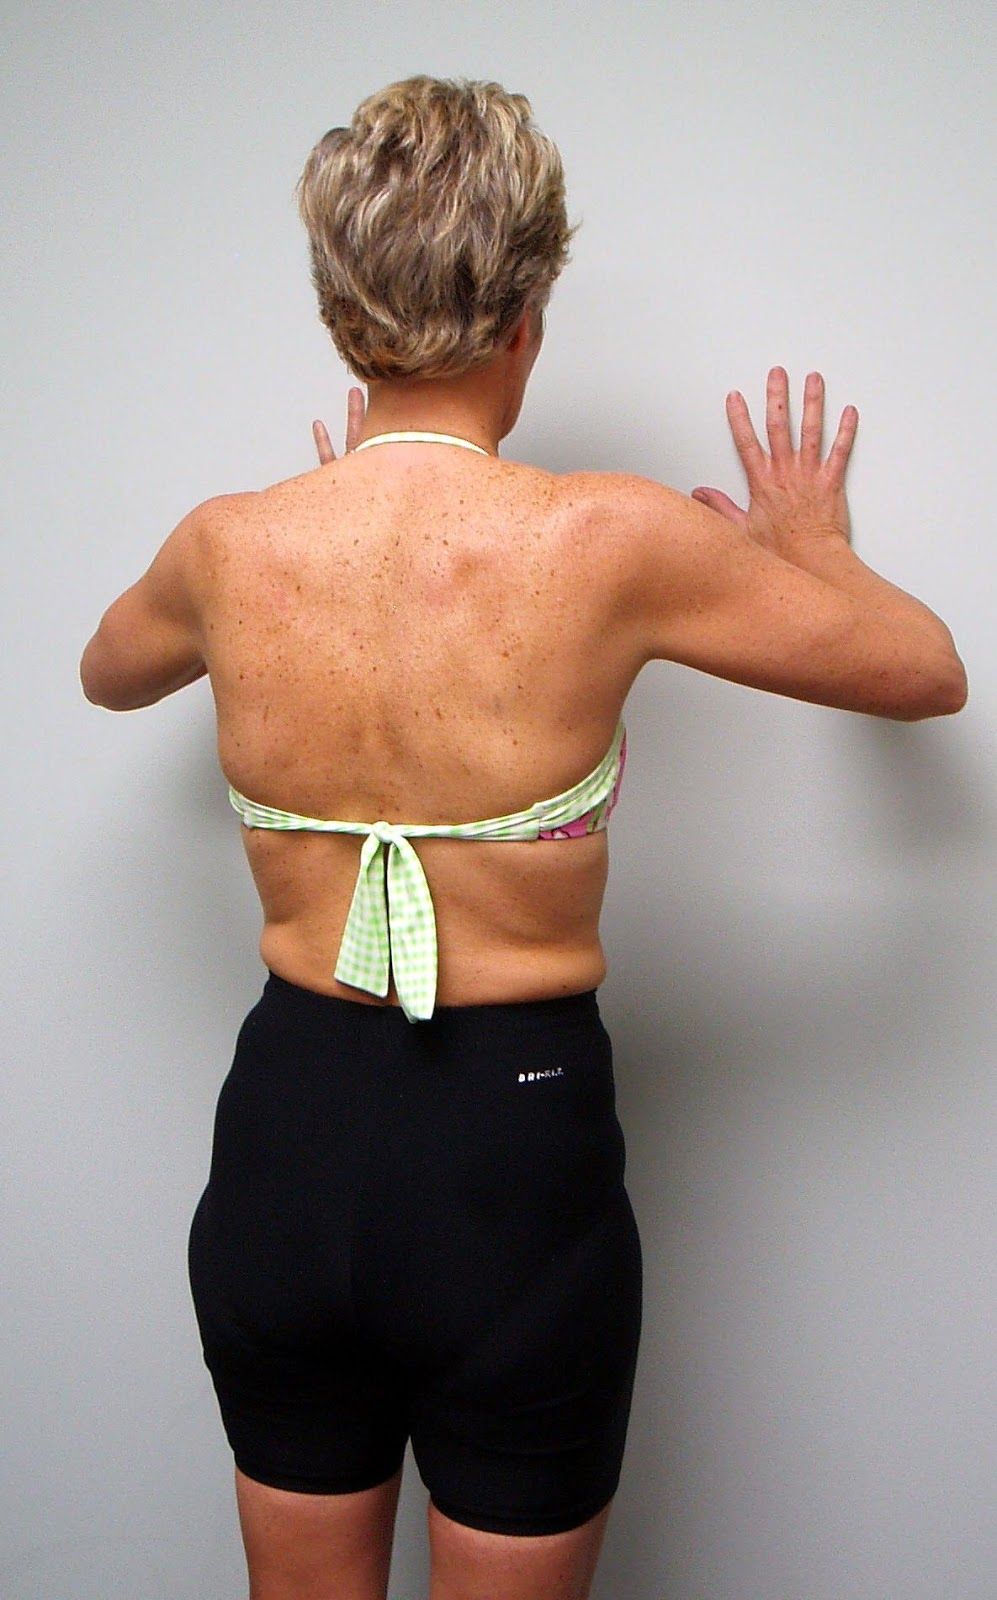
The patient is standing facing a wall with the feet parallel and hip width apart and approximately 2 feet away from the wall. The patient is instructed to perform a wall push-up, slowly lowering the trunk and chest towards the wall while keeping the spine straight.
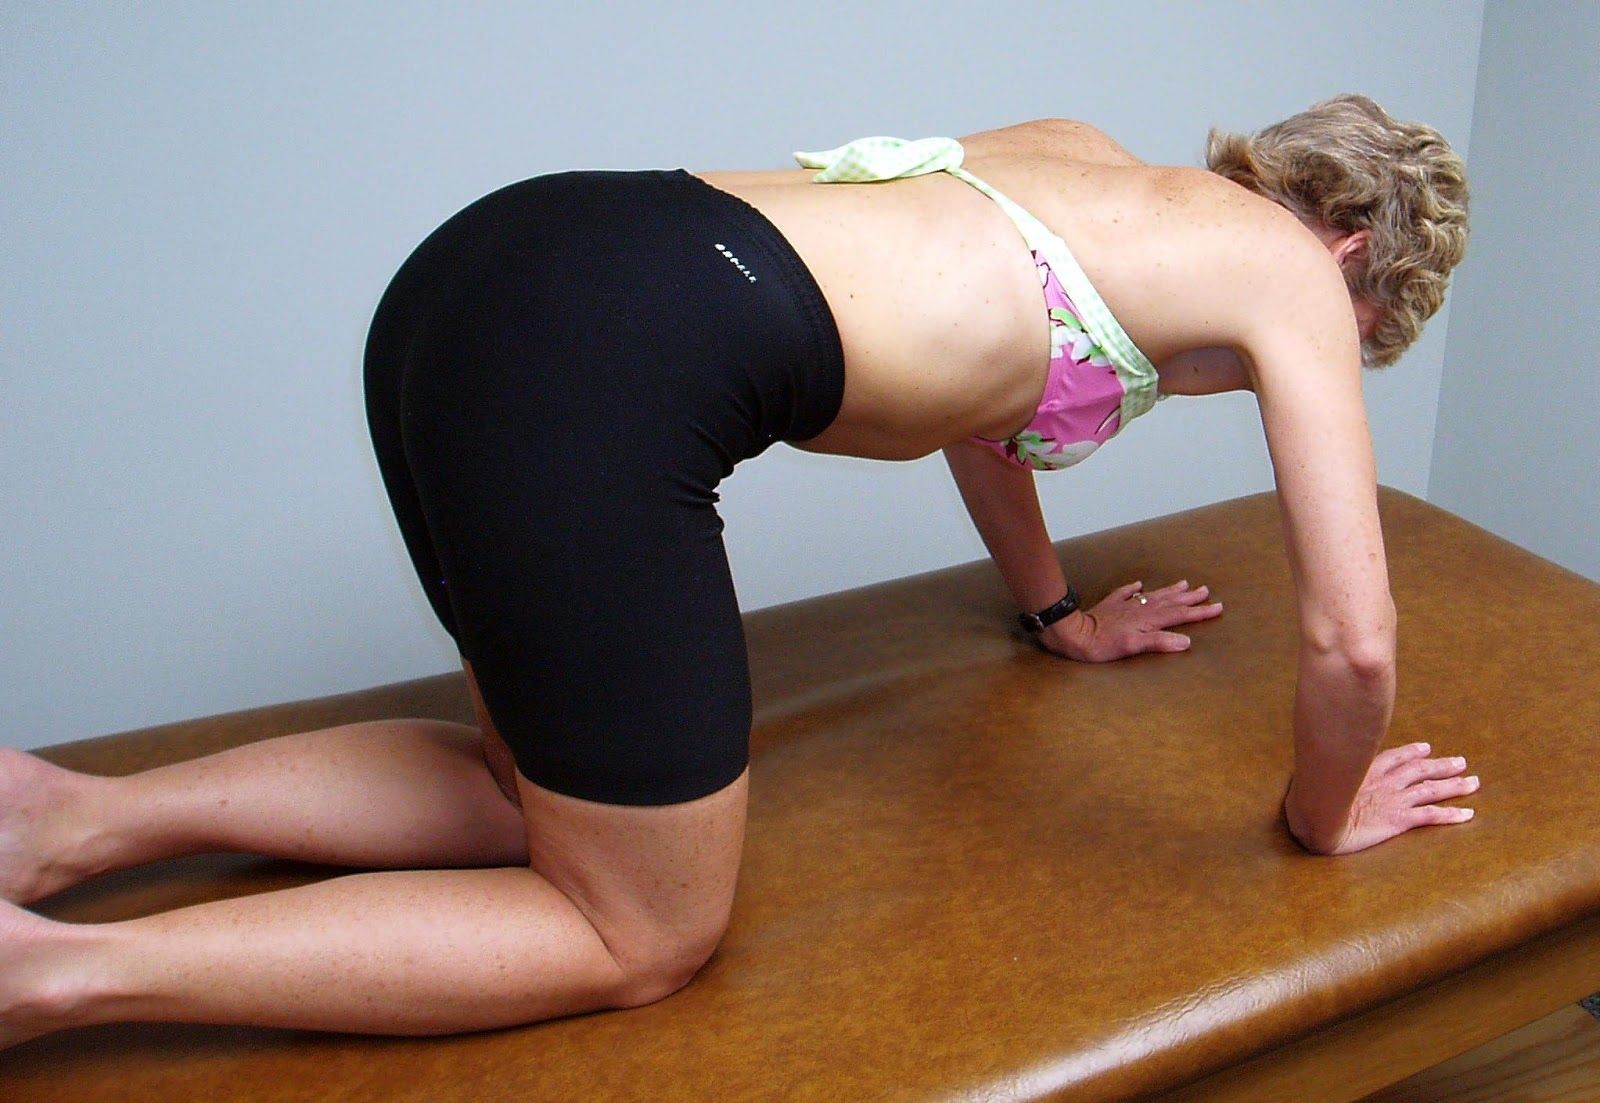
An alternative test can be done in hands and knees. The patient bends the elbows so that the shoulders are the same height as the hips and the head is held level with the spine.
Interpretation and the most common dysfunctional pattern seen
During the wall push up the examiner observes for any scapular winging during the movement indicating inhibition/weakness of the scapular stabilizers, i.e., the lower trapezius, serratus anterior, and rhomboids.
During the hands and knees stability test the examiner observes for any winging of the scapula. The patient is then asked to raise one hand off the table to further challenge the scapular stabilizers. The therapist looks for any weakness/winging of the scapula on the support arm side.
Cools et al., 2005 reported finding a decrease in strength of the scapular protractors (serratus anterior) in overhead athletes with impingement syndrome compared to a group of overhead athletes without a history of shoulder pain further supporting the importance of focusing on scapular stabilizing exercises in patients complaining of shoulder pain.
We further believe that recruitment and the force output of the major scapular stabilizing muscles, the middle and lower trapezius and serratus anterior are greatly influenced and inhibited by thoracic non-neutral spinal dysfunctions. We have consistently observed that ERS dysfunctions from T3-6 inhibit the serratus anterior. These patients often present with a straight, and sometimes, even lordotic upper thoracic spine with visible scapular winging at rest.
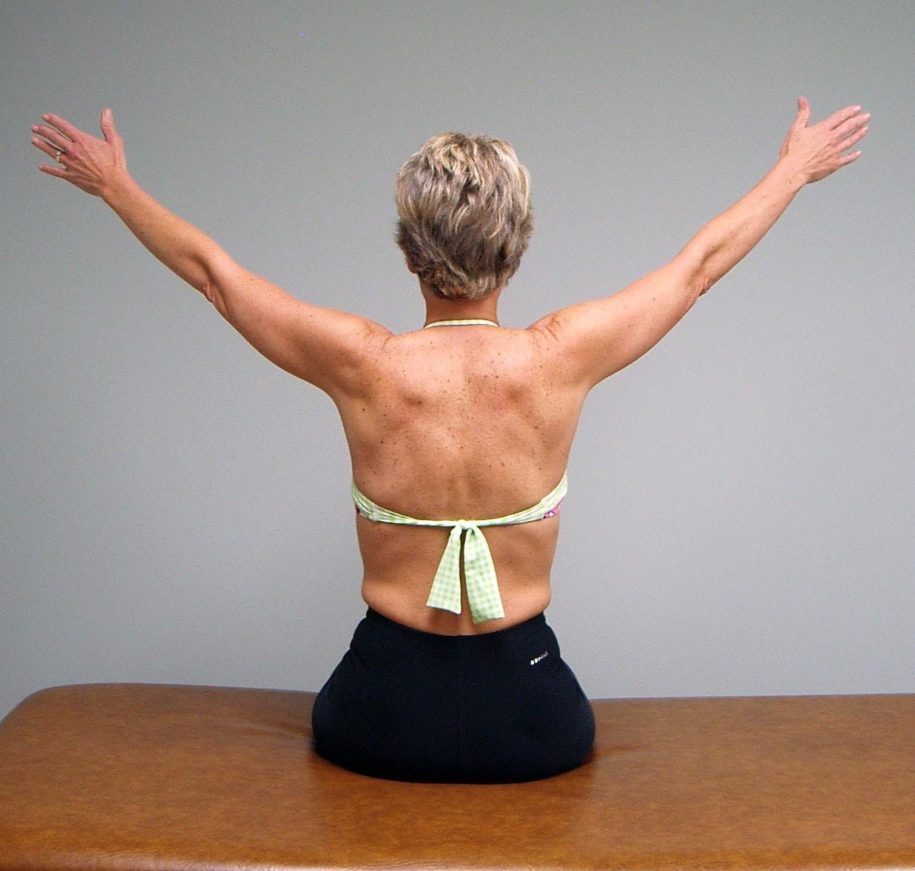
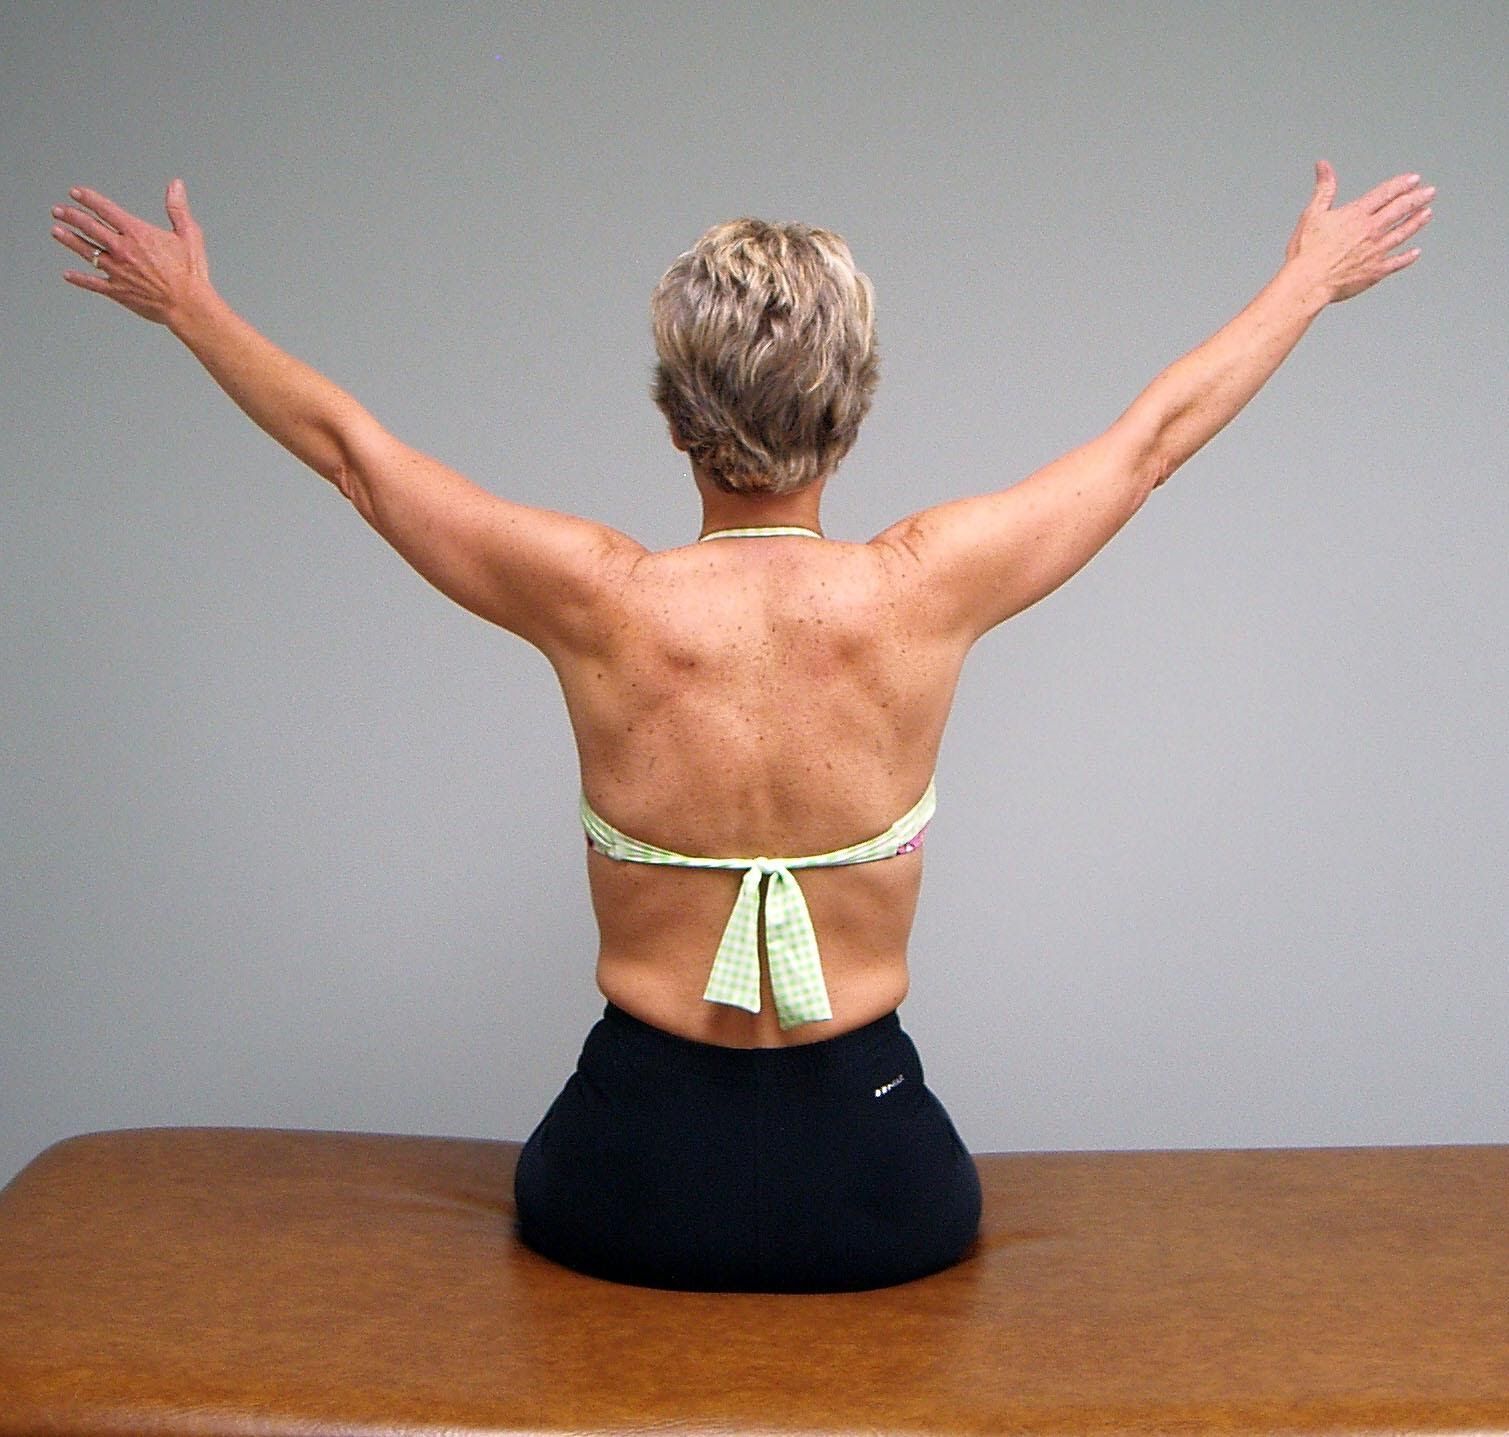
The patient is seated and instructed to raise the arms out to the sides and overhead.
The therapist observes for any faulty substitution patterns while the patient raises and lowers the arms.
Notice that this patient, who was complaining of right shoulder pain, elevates and excessively upwardly rotates the right scapula indicating a loss of scapular stability and dysfunctional biomechanics for right shoulder abduction.
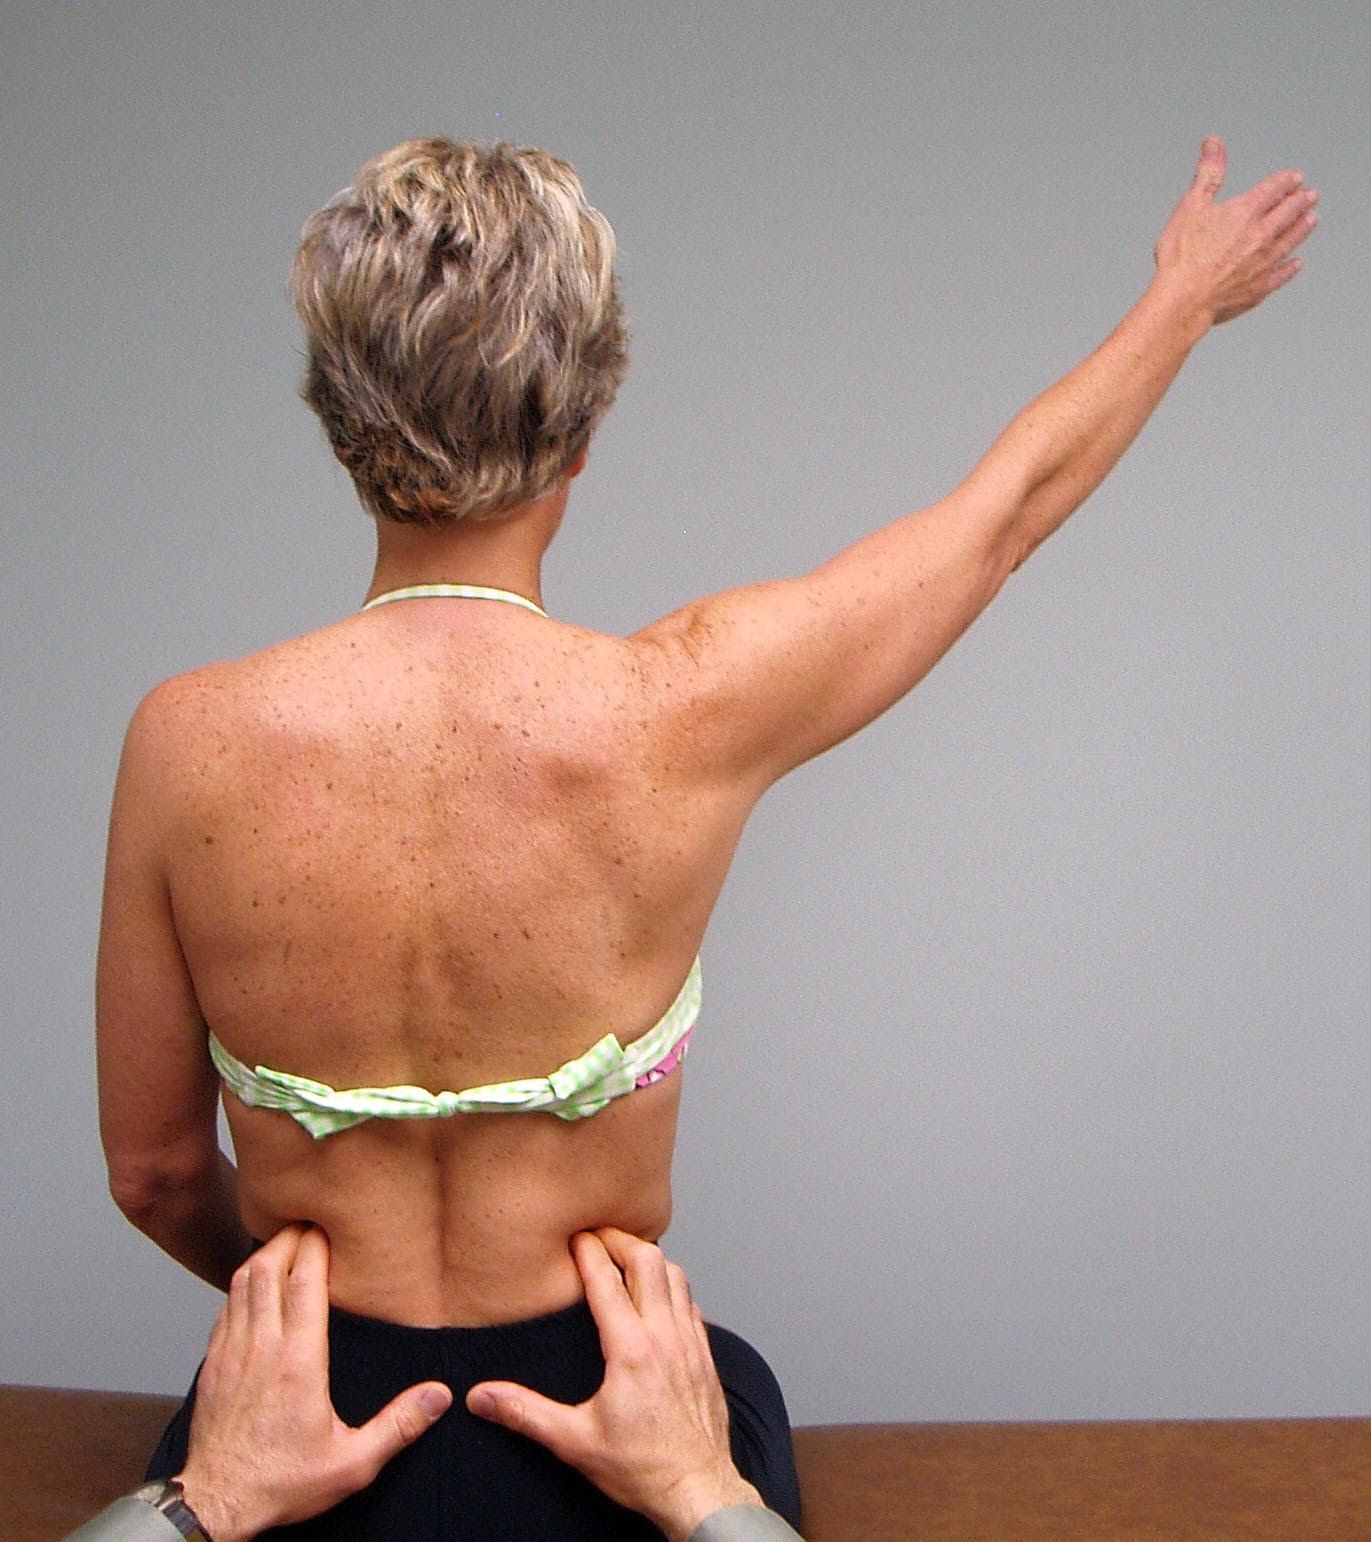
After observing bilateral shoulder abduction the patient is asked to raise one arm at a time with the examiner palpating the quadratus lumborum muscles bilaterally for appropriate firing. During right shoulder abduction the left quadratus lumborum should fire, especially at about 120 degrees of abduction to offset the weight of the right arm. If the right quadratus lumborum fires while raising the right arm it indicates an abnormal/dysfunctional muscle firing pattern. The patient is then forced to compensate by elevating the shoulder girdle with the upper trapezius and levator scapula muscles which become hypertonic and shortened.
Interpretation and the most common dysfunctional patterns seen
Janda, 1990 described a normal sequential shoulder abduction firing pattern occurring as follows:
supraspinatus
deltoid
contralateral and ipsilateral upper trapezius/levator scapulae
contralateral quadratus lumborum
contralateral peronei
He did not mention the role of the serratus anterior or lower trapezius muscles. Elevation of one shoulder girdle during the test and/or scapular winging may be due to a muscular imbalance between the levator scapulae and upper trapezius which are hyperactive and tight and inhibition of the lower trapezius, serratus anterior and supraspinatus which appear to be weak. EMG analysis of the three divisions of the trapezius muscle during isokinetic shoulder abduction has shown that the upper trapezius activity is increased whereas the lower trapezius activity is decreased in overhead athletes with a history of shoulder impingement when compared to a control group of non-injured athletes (Cools et al., 2007). It has also been reported that shoulder impingement patients have delayed firing of the middle and lower trapezius during sudden perturbations of the shoulder compromising the functional stability of the scapula (Cools et al., 2003).
We have observed that overutilization of the upper trapezius and levator scapulae may also occur when the ipsilateral rather than contralateral quadratus lumborum fires limiting the patient’s ability to elongate the spine on that side resulting in excessive compensatory superior translation of the scapula during abduction of the shoulder.
Normally during shoulder abduction the scapula upwardly rotates, externally rotates and posteriorly tilts (Ludewig, Cook, Nawoczenski, 1996), occurring as a result of a force coupling involving the upper and lower trapezius and serratus anterior. Lukasiewicz et al., 1999 reported that when comparing subjects with signs and symptoms of shoulder impingement to an asymptomatic matched control group that the impingement patients presented with a decrease in posterior tilting during humeral elevation with excessive scapular superior translation. Interestingly, they did not find a difference in the amount of upward rotation between the two groups. Based upon their findings they proposed that exercise programs for shoulder impingement patients should probably include stretching of the pectoralis minor and strengthening of the serratus anterior to address this loss of posterior tilt.
Therefore, it is well known that when the lower trapezius and serratus anterior are inhibited/weak there is a loss of not only scapular stability, but also all three planes of normal scapular mobility during humeral elevation. Hyperactivity of the levator scapula and upper trapezius results in elevation, downward rotation and anterior tilt of the scapula. Hyperactivity of the pectoralis minor protracts, internally rotates and anteriorly tilts the scapula.
We propose that a strain of the cervical spine occurs due to the hypertonicity of the levator scapula muscle as it attaches to the upper four cervical segments. Stretching the levator scapula not only reduces the strain in the neck, but, if properly done, allows posterior tilting of the scapula to occur unimpeded during shoulder elevation.
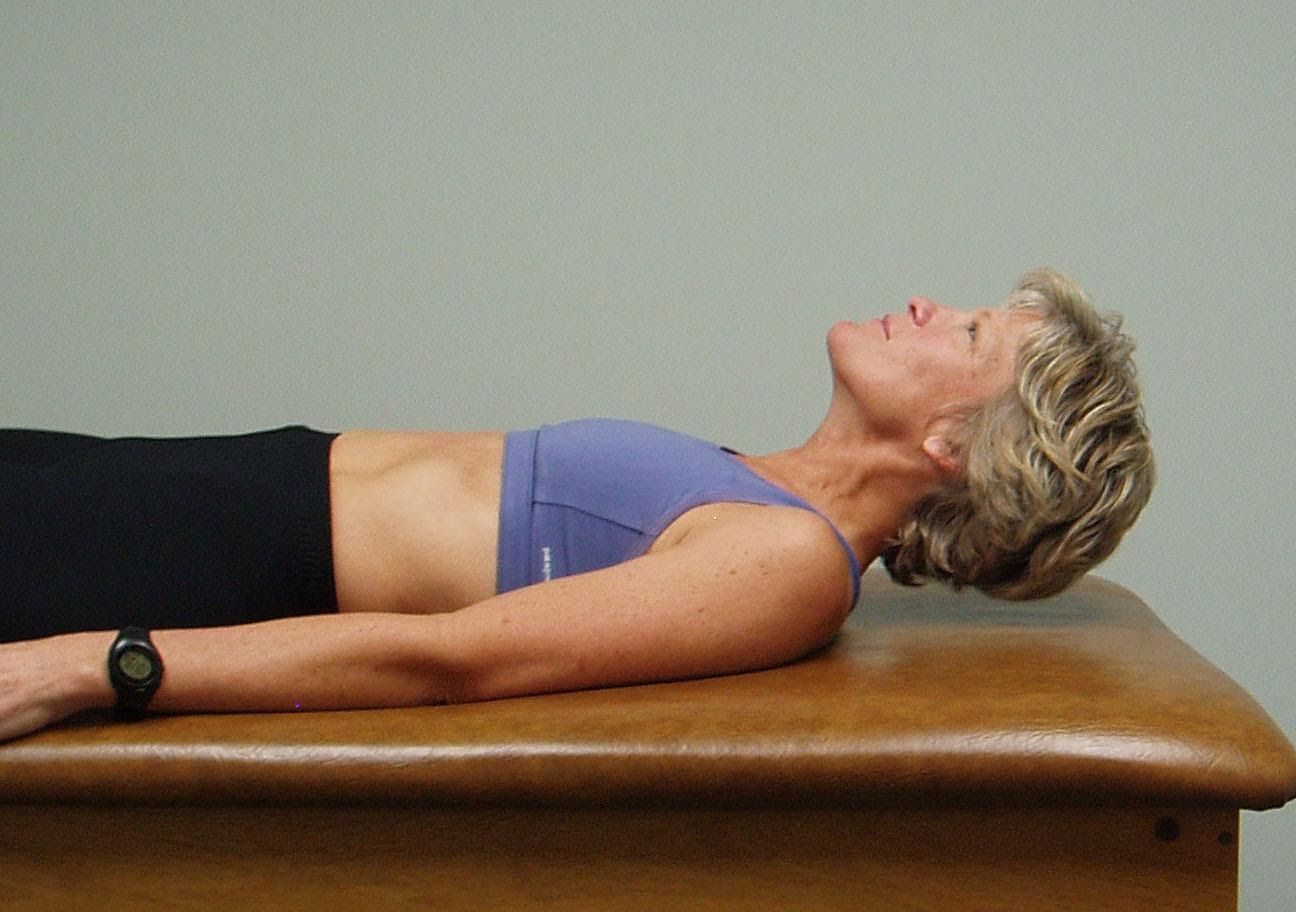
The patient is supine with legs straight and arms down to the sides.
Ask the patient to raise the head off the table and look down towards their feet.
Observe how the patient lifts the head, does the patient initiate the movement by progressive segmental flexion from above down or do they initiate the movement leading with the chin up?
Interpretation and the most common dysfunctional pattern seen
Normally the patient should be able to easily lift up their head and segmental flex thru the cervical spine utilizing their deep neck flexors throughout the full range of motion (pictured on the top)
The therapist watches for the chin to protrude forward indicating substitution by the sternocleidomastoid muscles for the inhibited deep neck flexors (pictured on the bottom).
If this movement is viewed as dysfunctional the therapist should then passively flex the neck to determine if this is a mobility problem or an inhibition problem. If passive ROM is restricted this is a mobility problem due to tight cervical extensors, an ERS dysfunction of the upper thoracic spine, hypertonic upper trapezius and/or levator scapulae, adverse neural tension, etc. If passive ROM of the cervical spine is free, but the active movement is dysfunctional think about a motor control/inhibition problem.
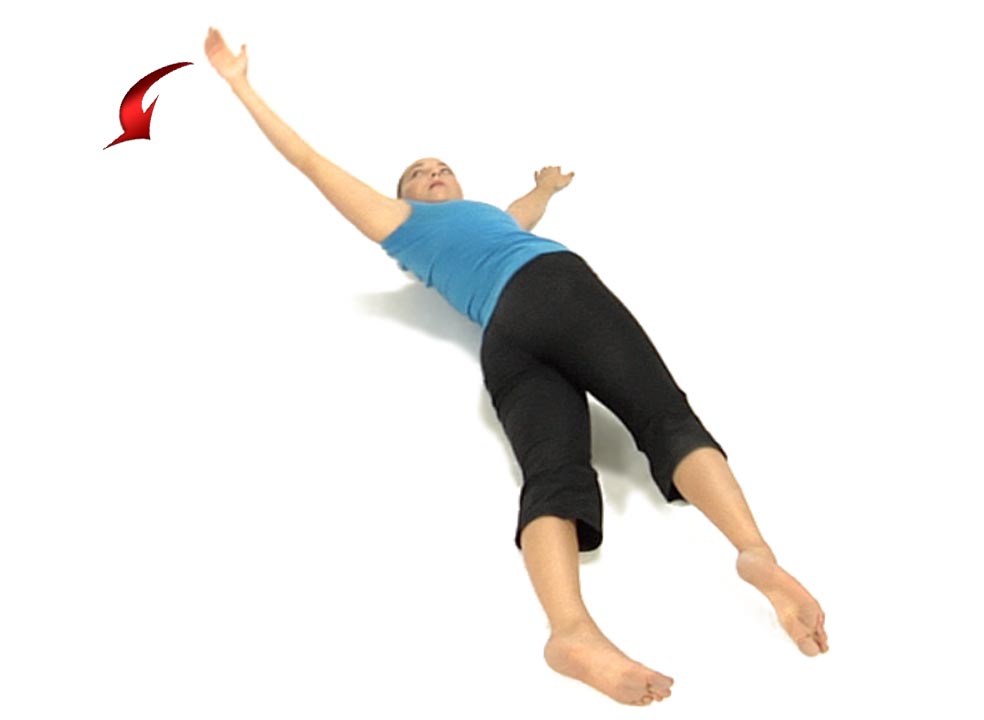
Patient is lying supine with the arms separated overhead and legs apart, at the 10 and 2 and 8 and 4 o’clock positions.
Ask the patient to roll onto her stomach by reaching obliquely across the trunk to roll onto her stomach using only her right arm.
Instruct the patient to lift up her head and look under her left axilla to facilitate the movement. A common dysfunctional pattern is that the patient will extend the head and neck rather than lead with head and neck flexion making this movement more difficult to perform.
The lower body should not contribute to the roll, but follow the rotation of the spine and pelvis. Watch to insure that the patient doesn’t push off through the right foot to assist this movement.
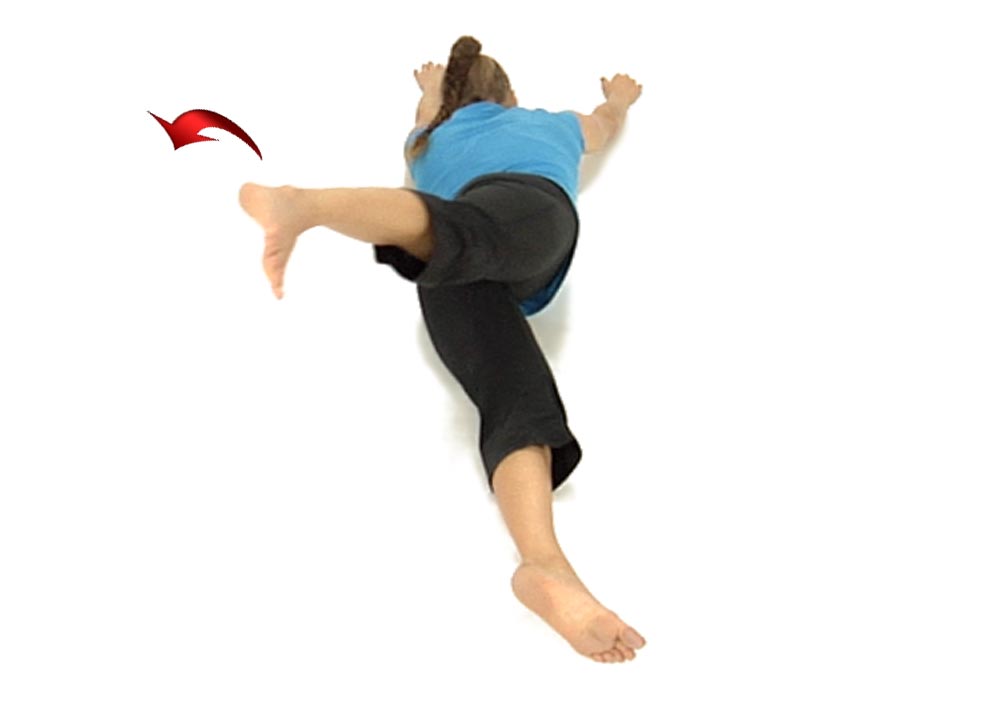
Once prone ask the patient to roll over onto her back using the right arm only.
The head and neck should extend and rotate to the right as the arm is brought back.
The lower body/legs should not contribute to the roll. A common substitution pattern is for the patient to push off with the right foot or left hand to assist this movement.
Ask the patient to repeat the movement 5 to 6 times as tolerated to both sides.
Patient is lying supine with the arms separated overhead and legs apart, at the 10 and 2 and 8 and 4 o’clock positions.
Ask the patient to roll over to the prone position starting and moving by using the right leg only.
The patient should lead with right hip flexion followed by adduction of the extended leg.
The upper body should not contribute to the roll, but follow segmentally the movement of the right leg and pelvis. Watch for any breath holding or substitution by pushing off the left foot.
If the patient has difficulty you can use verbal cues and manual contacts thru the pelvis to assist. Asking the patient to elongate along the axis of movement can be helpful. In the illustrated example above the patient would attempt to elongate thru the right arm and/or left leg as they roll to the left.
You can also provide compression through the bottom of the left foot or through the right arm to encourage elongation through the axis of movement.
Once prone you instruct the patient to roll back to supine initiating the movement through the right leg by extending the hip, adducting the hip and segmentally extending back through the spine without substituting by pushing off with either hand or the left foot. The same manual contacts can be applied to the left foot and/or right arm to assist the patient as needed.
Ask the patient to repeat the movement 5 to 6 times as tolerated to both sides.
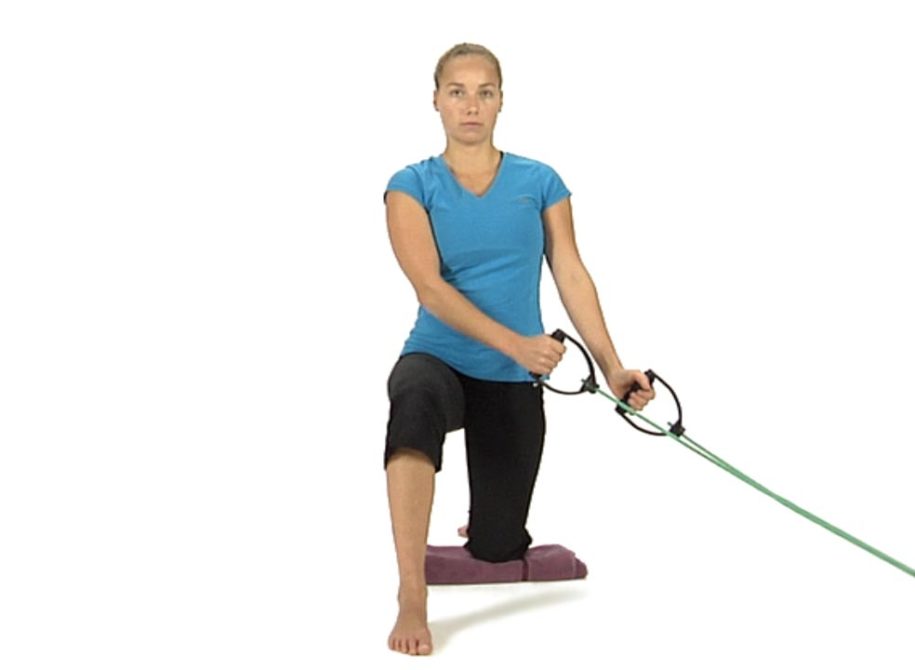
Lifting is an upward oblique movement from a low position to a high position.
The patient starts in half kneeling with the left knee down and right knee flexed to 90 degrees and with the R knee centered over the right foot. Both arms are lowered off to the left side holding onto handles that are attached to resistance bands.
Ask the patient to find a neutral lumbar spine then draw the belly in to maintain it throughout the exercise.
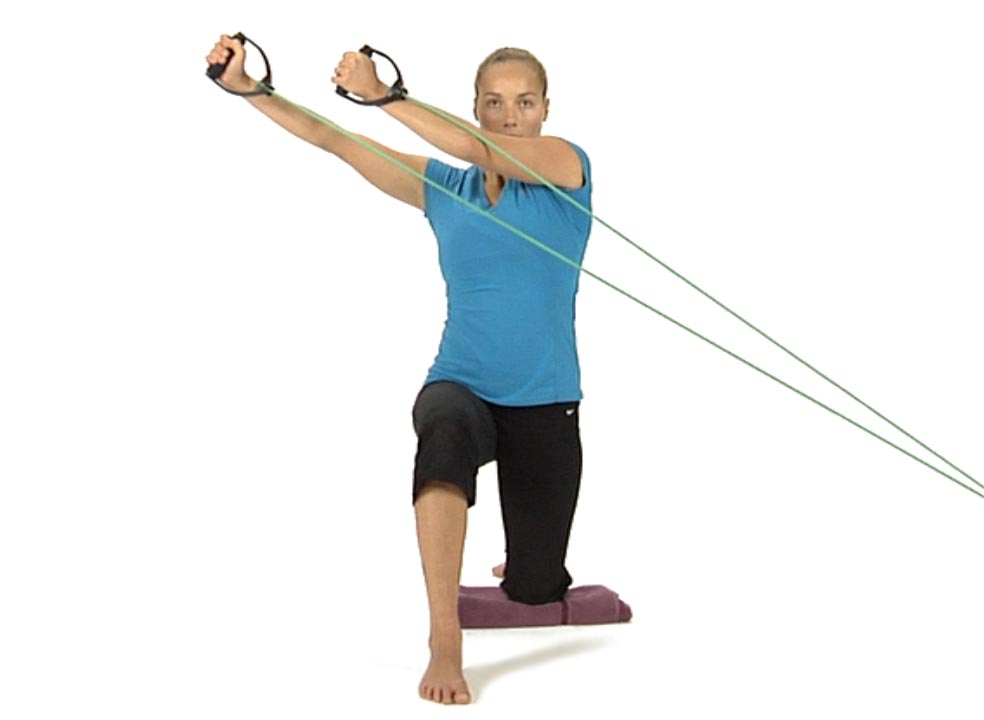
Instruct the patient to keep their eyes and head facing forward as they pull obliquely up and across their body above their right shoulder extending both arms.
Their trunk should remain still and their spine in neutral as they perform 6-8 repetitions.
Then have them switch their hand positions and repeat the lifting motion in the opposite direction.
The patient can begin this exercise with their legs initially separated for a more stable base and then bring the legs closer together to increase the level of difficulty.
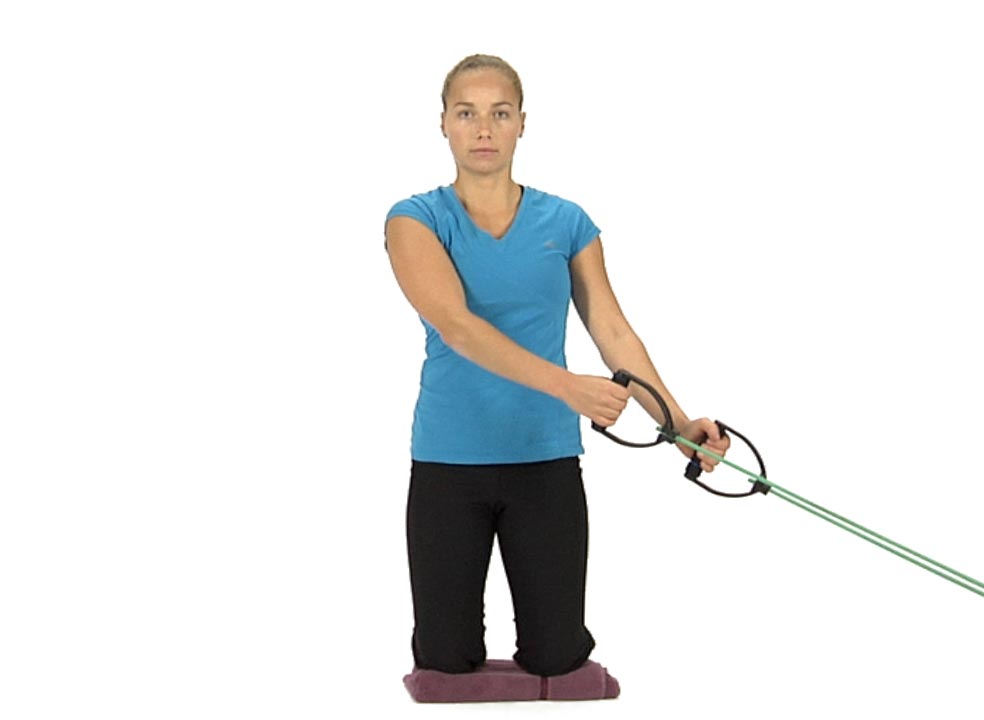
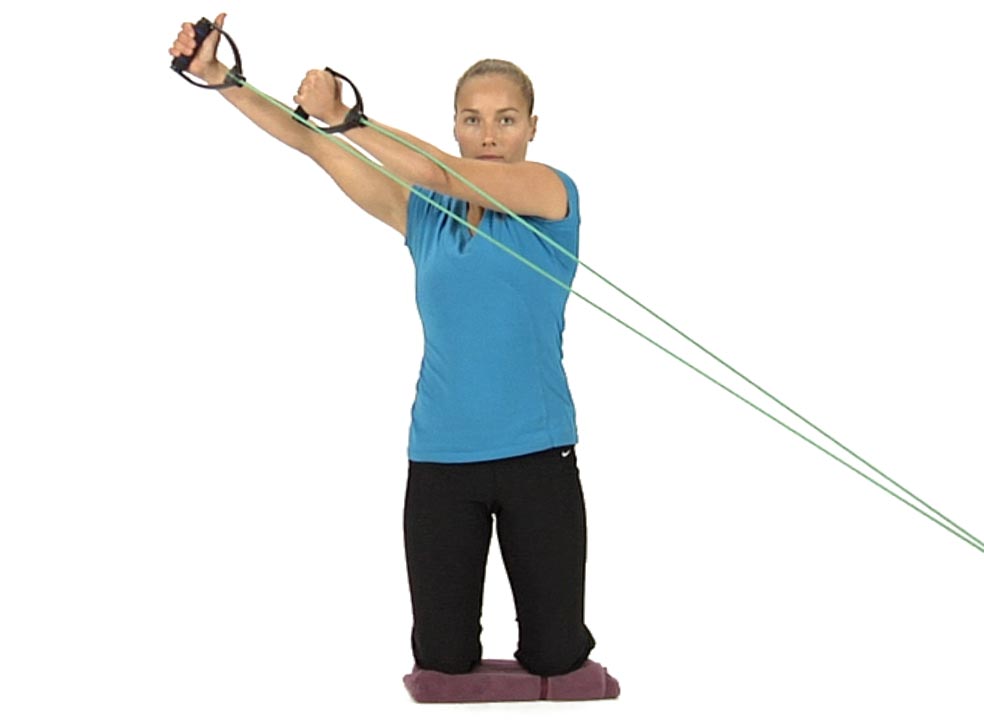
Lifting is an upward oblique movement from a low position to a high position.
The patient starts in kneeling with both arms lowered off to the left side holding onto handles that are attached to resistance bands.
Ask the patient to find a neutral lumbar spine then draw the belly in to maintain it throughout the exercise.
Instruct the patient to keep their eyes and head facing forward as they pull obliquely up and across their body above their right shoulder extending both arms.
Their trunk should remain still and their spine in neutral as they perform 6-8 repetitions.
Then have them switch their hand positions and repeat the lifting motion in the opposite direction.
The patient can begin this exercise with their knees initially separated for a more stable base and then bring the knees closer together to increase the level of difficulty.
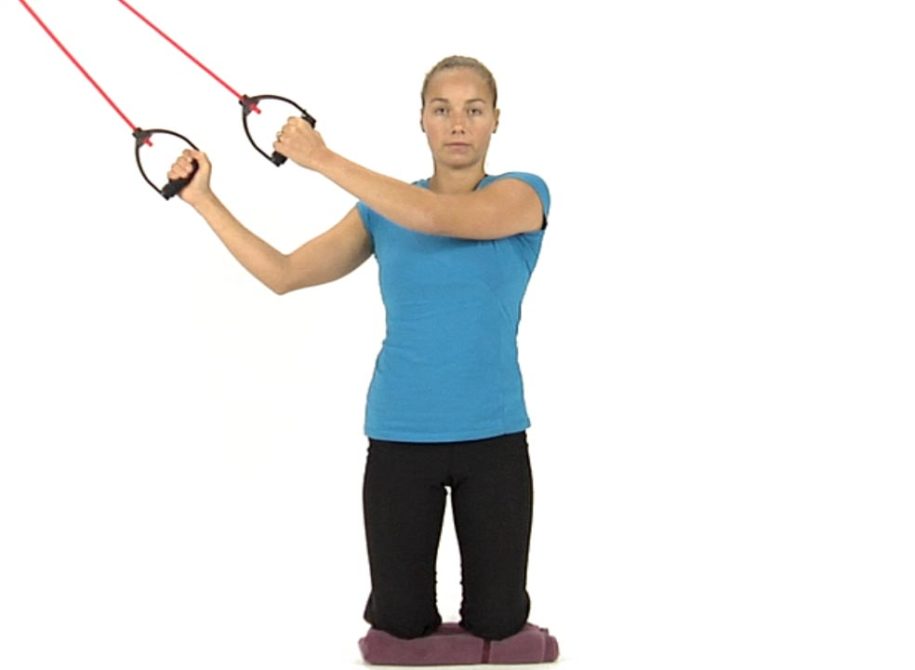
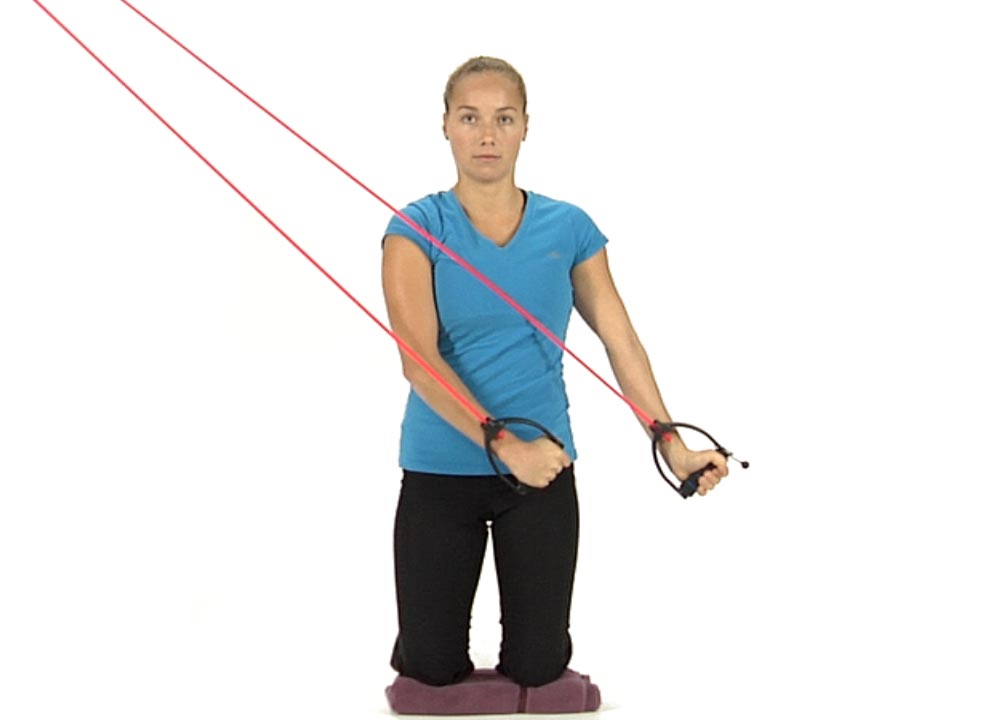
Chopping is the downward oblique movement across the body from a high position to a low position.
The patient starts in kneeling with both arms raised up over the right shoulder holding onto handles that are attached to resistance bands.
Ask the patient to find a neutral lumbar spine then draw the belly in to maintain it throughout the exercise.
Instruct the patient to keep their eyes and head facing forward as they pull obliquely down and across their body towards the left knee extending both arms.
Their trunk should remain still and their spine in neutral as they perform 6-8 repetitions.
Then have them switch their hand positions and repeat the chopping motion in the opposite direction.
The patient can begin this exercise with their knees initially separated for a more stable base and then bring the knees closer together to increase the level of difficulty.