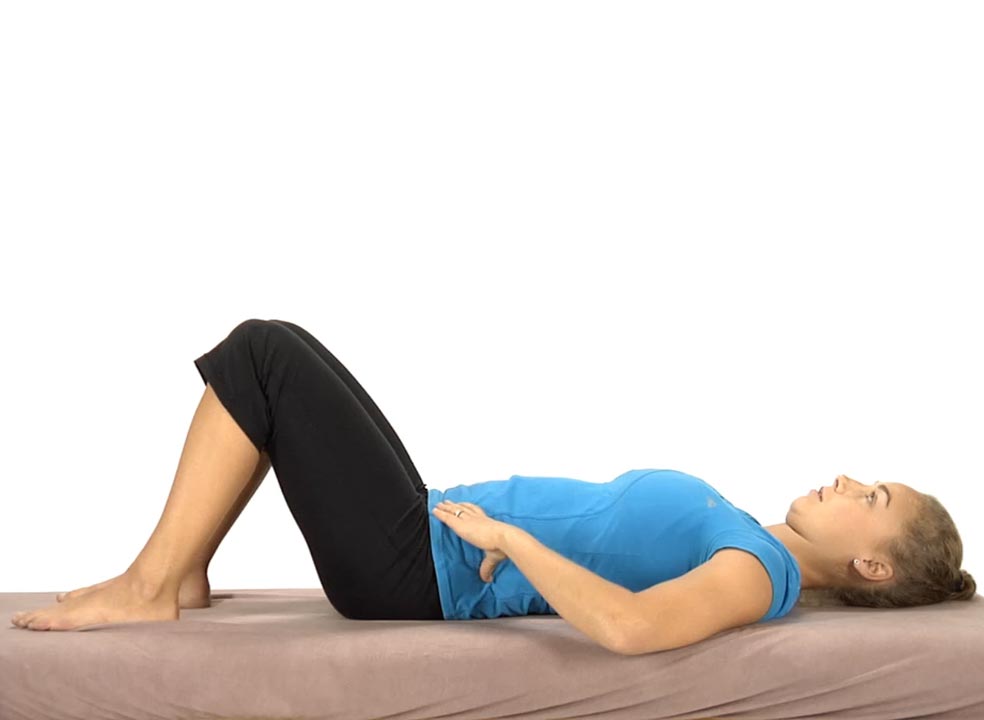
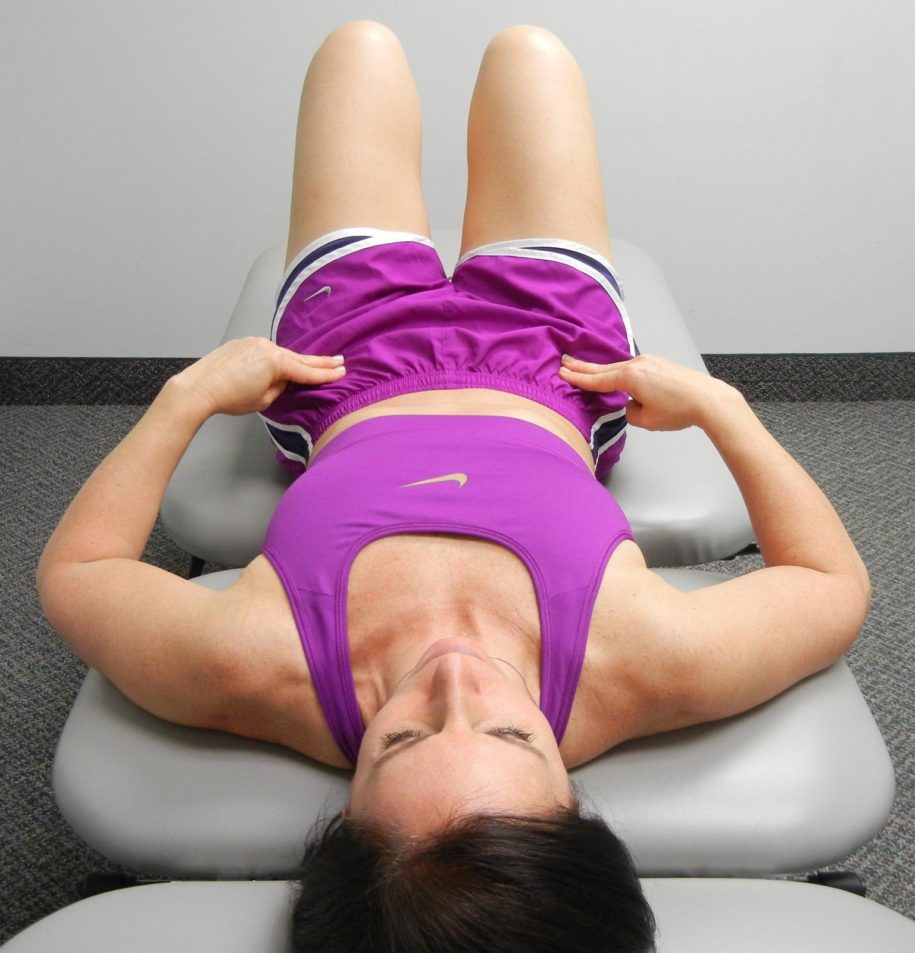
The patient is lying on their back with the hips and knees flexed and feet flat on the table.
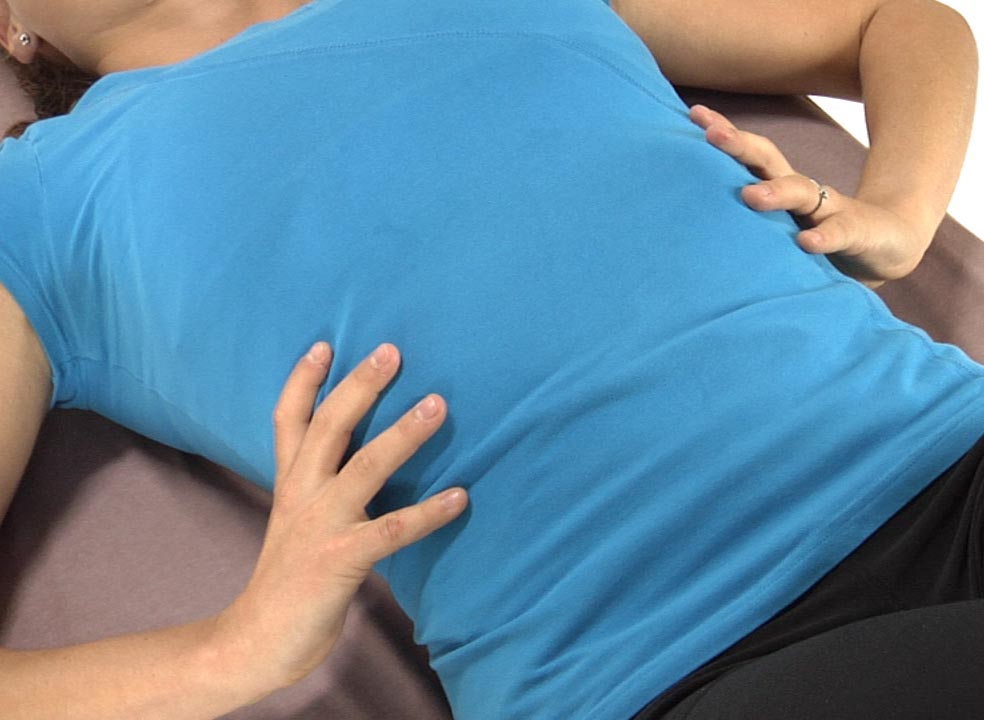
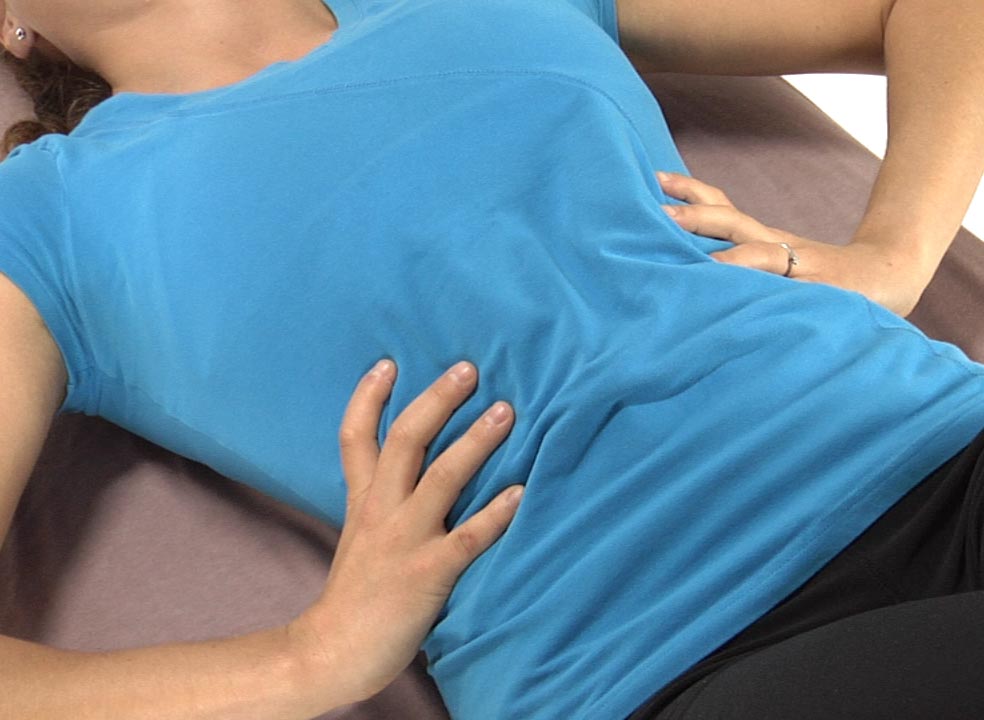
Have the patient place their hands on both sides of the lower rib cage.
Ask the patient to find a neutral lumbar spine by rolling the pelvis towards 6 and 12 o’clock and finding the midpoint in the range.
Instruct the patient to draw the belly in without flattening their lower back maintaining a neutral lumbar spine. The patient monitors the ASISs to make sure that they remain level throughout this exercise.
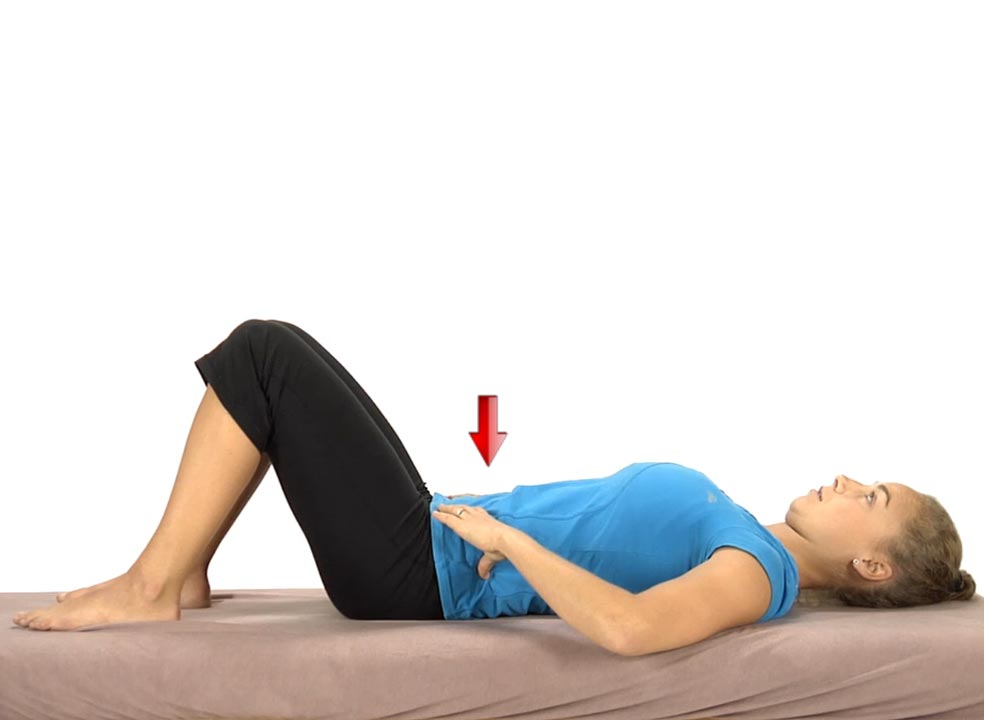
Instruct the patient to slowly inhale through the nose allowing their lungs to fill with air as the rib cage expands out to the sides as they draw the navel in. Their chest and shoulders should remain relaxed and they should not feel that their belly pushes out or that the lower ribs are pulled down and medially by the obliques which can often substitute with transversus abdominis dysfunction.
The patient exhales through pursed lips and allows the ribs to fall down and in. Their upper chest should continue to remain relaxed.
If they are having difficulty recruiting the transversus have them blow out as much air as possible during exhalation using their abdominal muscles to assist and hold for 3-5 seconds. Then have them slowly inhale while continuing to draw the belly in and hold for 10 seconds.
Have them repeat up to 10 times holding for 10 seconds each time.
The patient is lying on their back with the hips and knees flexed and feet flat on the table.
Have the patient place their hands on both sides of the lower rib cage.
Instruct the patient to slowly inhale through the nose allowing their lungs to fill with air as the rib cage expands out to the sides as they draw the navel in. Their chest and shoulders should remain relaxed and they should not feel that their belly pushes out or that the lower ribs are pulled down and medially by the obliques which can often substitute for transversus dysfunction.
The patient exhales through pursed lips and allows the ribs to fall down and in. Their upper chest should continue to remain relaxed.
Have them repeat up to 10 times holding for 10 seconds each time.
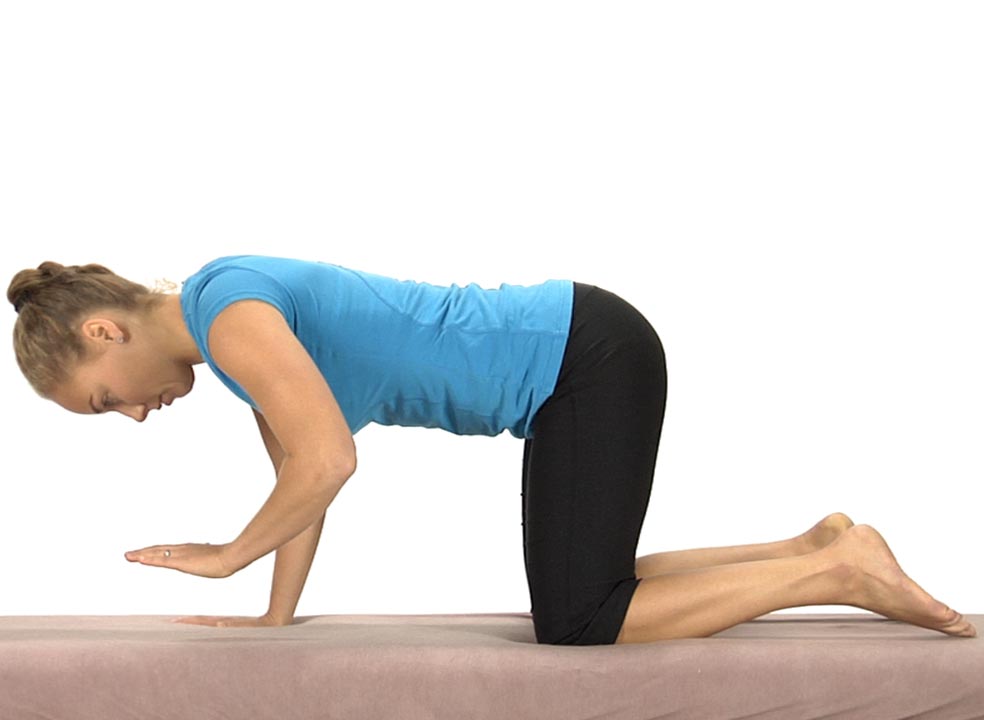
Starting in hands and knees with the hips positioned directly over the knees and the shoulders positioned directly over the hands, the patient is instructed to bend their elbows so that the shoulders are the same height as the hips.
The patient is instructed to find a neutral lumbar spine by rocking the pelvis from 12:00 to 6:00 and finding the midrange position.
The therapist monitors the PSISs to insure that they are level in the frontal plane before starting and during the performance of this exercise.
Instruct the patient to draw the belly up and in towards the spine without changing the lumbar neutral position. The therapist monitors the PSISs to insure that they remain stable and provides verbal feedback to the patient if any deviation should occur. The therapist should watch for any loss of the neutral lumbar spine position during the exercise.
Ask the patient to lift the left hand off the table and maintain a level pelvis and shoulder girdles.
Make sure the patient keeps their right elbow bent, shoulders level and they don’t drop their head when they lift their left hand.
Then have the patient switch sides lifting up the right hand.
The patient is instructed to hold for 10 seconds on each side as one repetition and repeat 3-5 times, gradually working up to 10 reps.
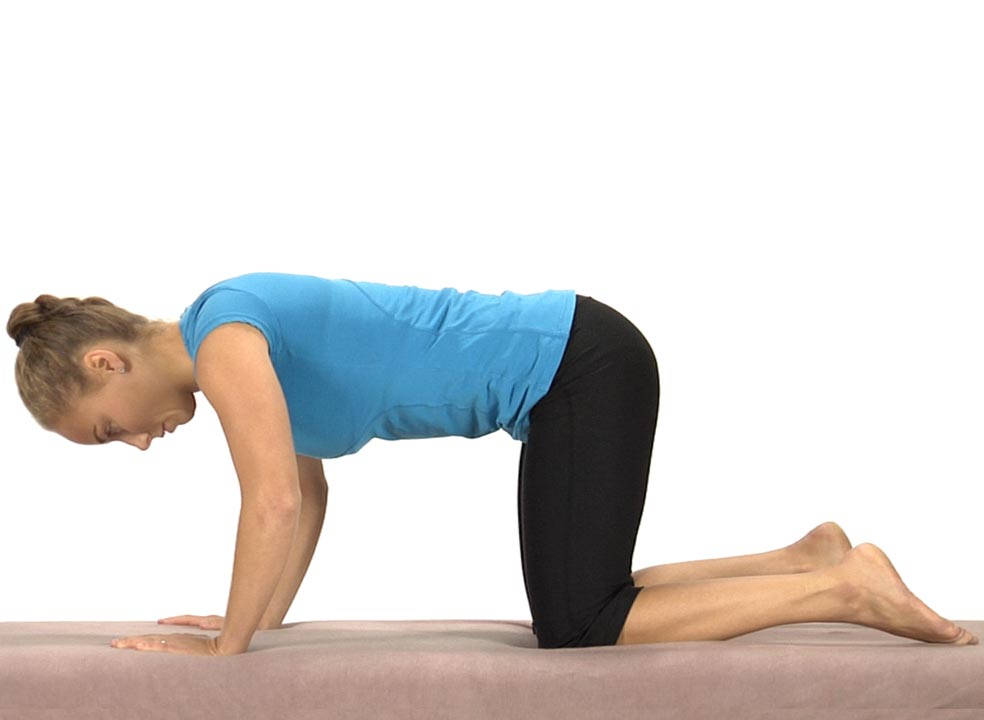
Starting in hands and knees with the hips positioned directly over the knees and the shoulders positioned directly over the hands, the patient is instructed to bend their elbows so that the shoulders are the same height as the hips.
The patient is instructed to find a neutral lumbar spine by rocking the pelvis from 12:00 to 6:00 and finding the midrange position.
The therapist monitors the PSISs to insure that they are level in the frontal plane before starting and during the performance of this exercise.
Instruct the patient to draw the belly up and in towards the spine without changing the lumbar neutral position. The therapist monitors the PSISs to insure that they remain stable and provides verbal feedback to the patient if any deviation should occur. The therapist should watch for any loss of the neutral lumbar spine position during the exercise.
The patient is instructed to hold for 10 seconds and repeat 3-5 times.
The ability to maintain a stable pelvis (level ASISs) while performing this functional movement test requires normal hip extension ROM and flexibility of the hip flexors with appropriate tone in the abdominal muscles. The abdominals must be strong enough to counterbalance the eccentric recruitment of the iliopsoas as the hip and leg are extended. An imbalance is seen when a hypertonic iliopsoas and weak abdominals results in an ASIS dropping inferiorly during the heel slide test.
After addressing any tightness in the anterior hip capsule, lengthening the hip flexors and mobilizing the femoral nerve as presented in module #3, then proceed to retraining the abdominals.
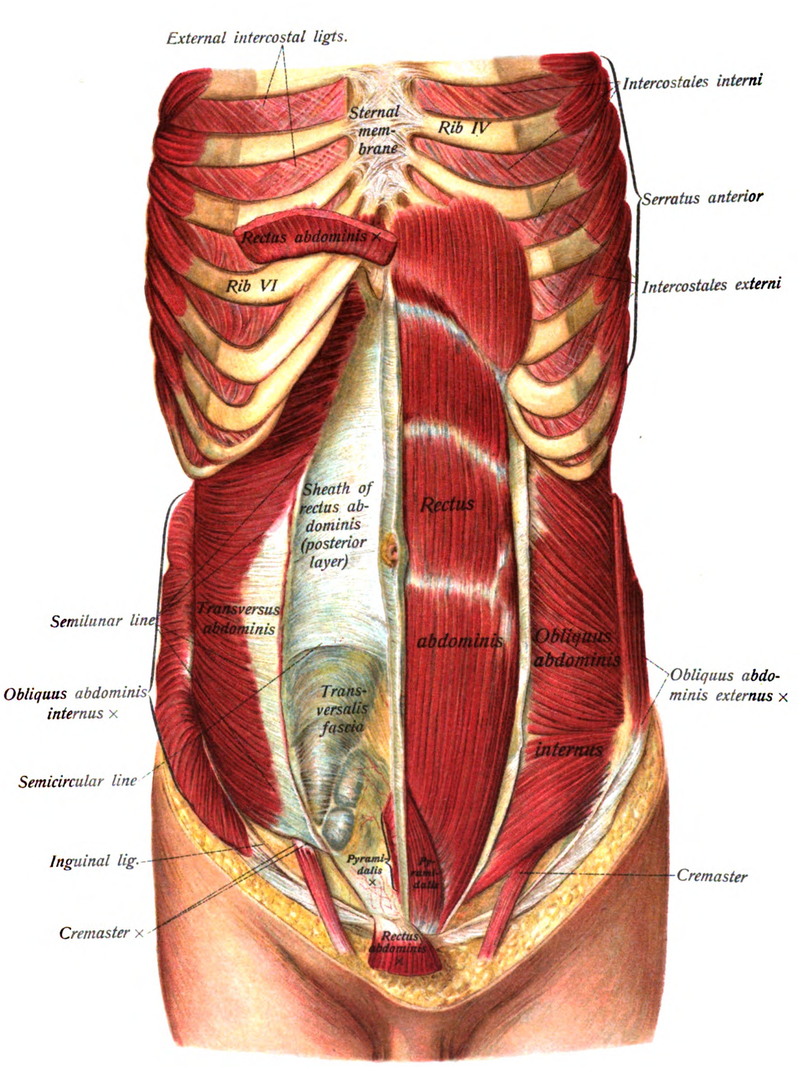
The Abdominals and Multifidi:
Global mobilizer in the sagittal plane – rectus abdominis Global mobilizer in the transverse plane– internal and external obliques Segmental stabilizer in the transverse plane – multifidi Segmental stabilizer in all three planes – transversus abdominis
Rectus Abdominis:
Global mobilizer – brings the pelvis towards the trunk or the trunk towards the pelvis. This muscle does not contribute to core stability. Innervation – 7th thru 12th intercostal nerves
Transversus Abdominis:
First trunk muscle to normally fire before you move your leg or arm in any direction, but in patients with a history of low back pain the transversus muscle fires late during movement of the lower limb (Hodges and Richardson, 1998) or upper limb (Hodges and Richardson, 1999).
The transversus appears to fire as part of a feedforward movement synergy pattern, but contrary to initial studies activation of this muscle is dependent on the direction of movement and often is not bilaterally symmetrical, (Allison, Morris and Lay, 2008)
Substitution Patterns to watch out for during retraining:
To retrain this movement dysfunction the patient is first instructed in how to monitor and maintain palpable symmetry at the ASISs when rolling the pelvis towards 12 o’clock. Most commonly the patient has difficulty drawing the R ASIS superiorly when rolling the pelvis towards 12 o’clock as shown in 2b.
The therapist should also observe/palpate the ASISs/PSISs when first instructing the patient in transversus abdominis retraining to insure that when performing the exercises the ASISs/PSISs remain stable and that one ASIS or PSIS does not drift inferiorly or superiorly during the active abdominal and pelvic floor engagement that occurs with these exercises.
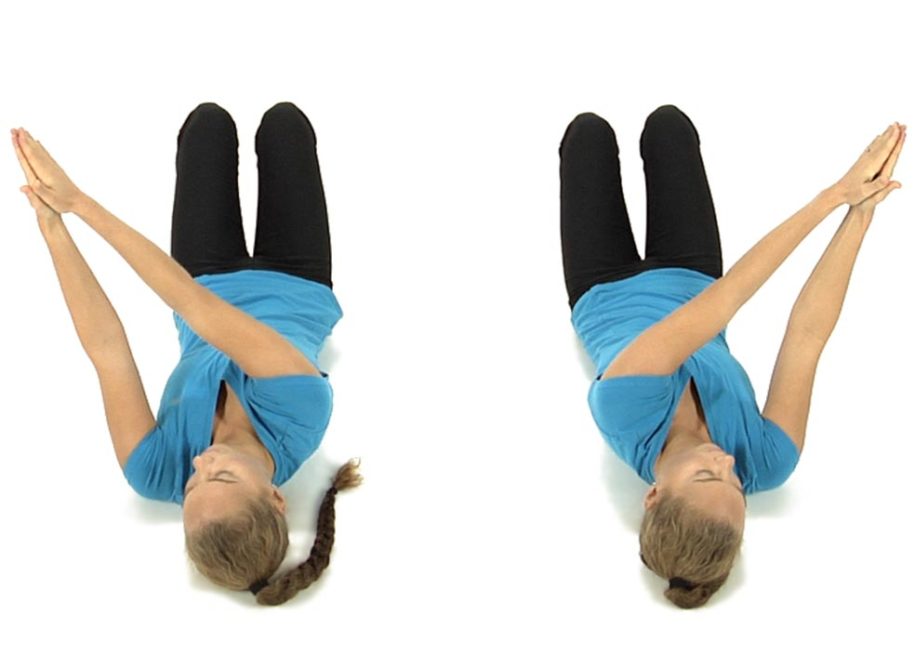
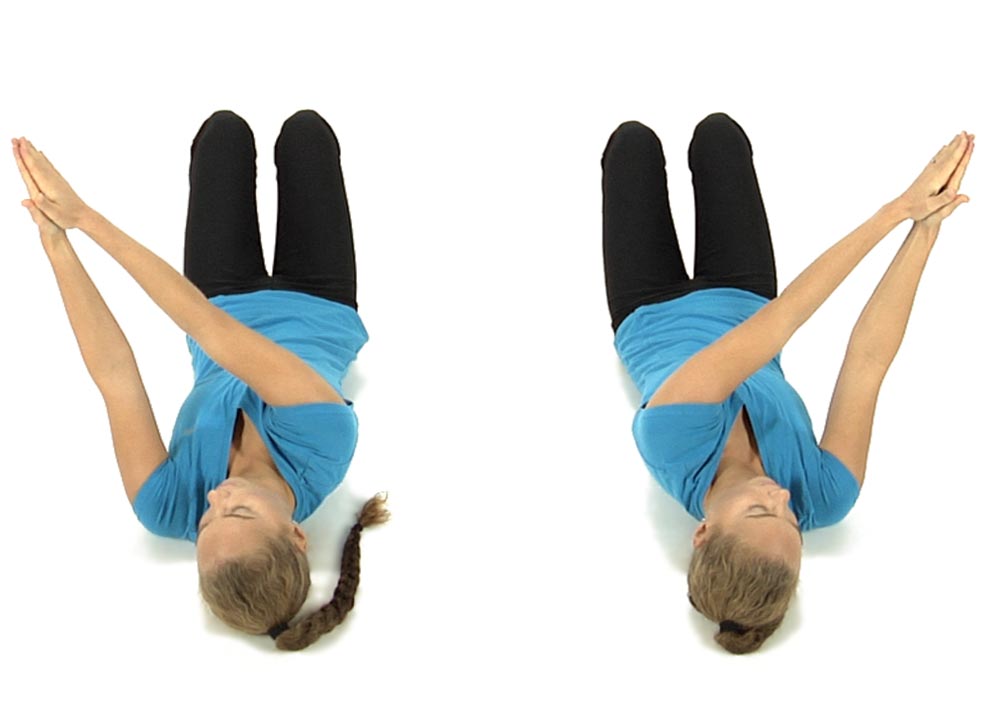
The patient is lying on their back with both knees bent up and the feet flat on the floor with their arms straight out in front and with palms together.
Instruct the patient to take their arms to the right and turn their head to the right as far as they can comfortably, then repeat to the left side to determine which side is easier to do.
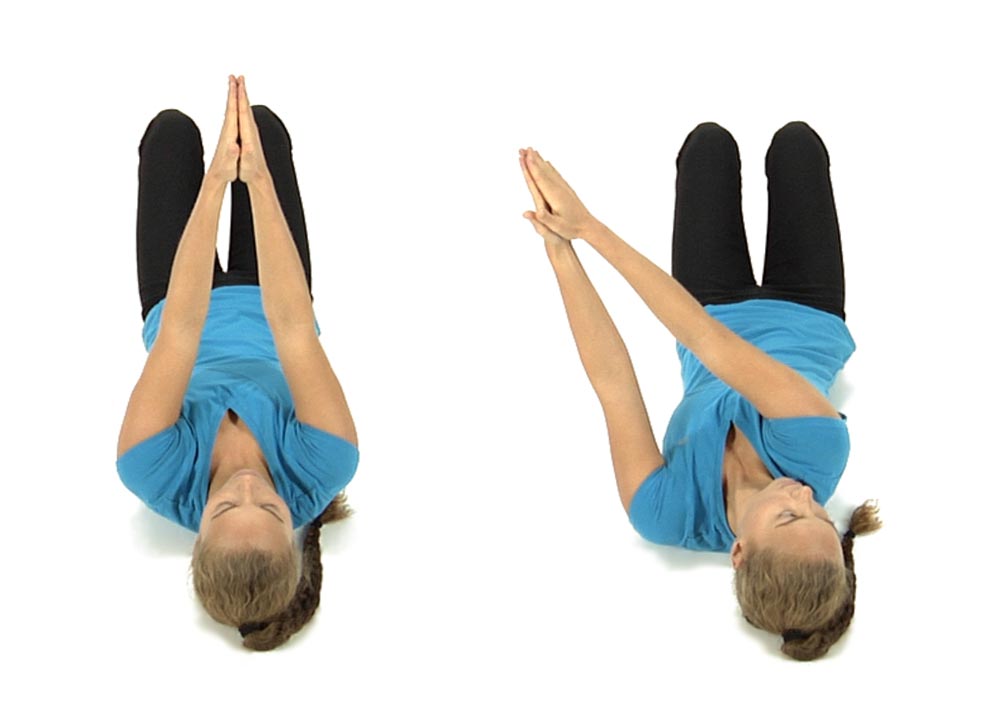
Then if they found it was easier to turn to the right side, have them take their arms to the right while they turn their head to the left as far as they can comfortably and without straining, then have them bring the head and arms back to the midline starting position and repeat 5 times, rotating their head and arms in opposite directions.
Then ask them to recheck their ability to turn to the right while looking to the right and see if it’s even easier than before.
Then repeat these movements going the opposite way with their arms going to the left as they turn the head to the right, repeat 5 times, then they stop and recheck their ability to bring their arms to the left as they look to the left.
They patient is instructed to finish by bringing their arms to the right as they look to the right and arms to the left as they look to the left, back and forth 5 times each way.
Then have the patient recheck their ability to rotate the pelvis towards 3 and 9 o’clock to see if it’s easier to perform.
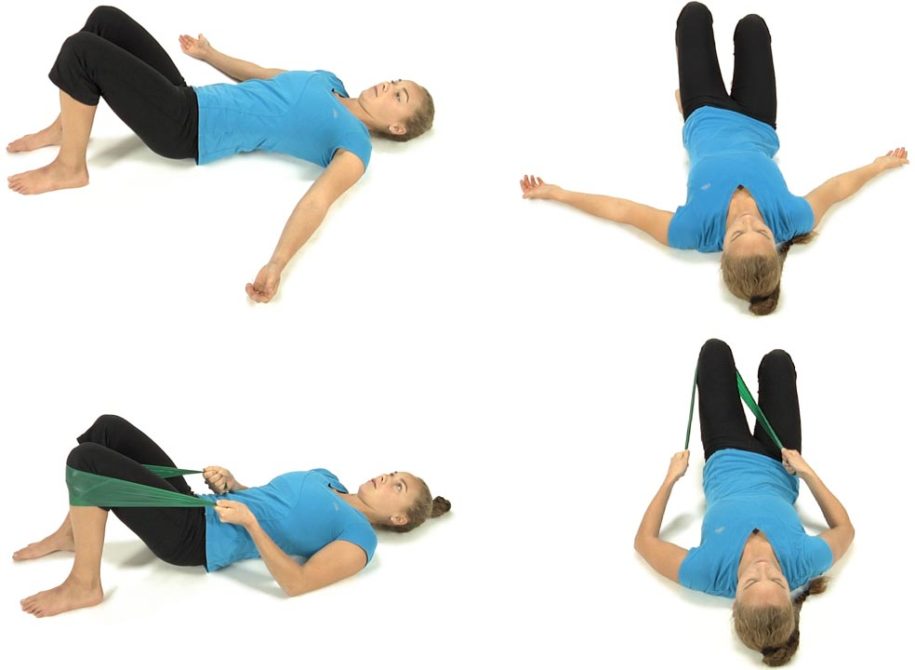
Unilateral bridging on the left side to re-educate 9 o’clock control:
The patient is lying flat on their back with their left knee bent and the left foot flat on the floor with their arms resting on the floor at the sides.
Instruct the patient to imagine that there is a string attached to their left knee that is pulling the knee forward over their left big toe as they slowly lift their left hip, then pelvis and finally the spine off the floor shifting their weight onto the right buttocks.
The patient should not lift any further than is comfortable while keeping their shoulders flat on the floor.
Then instruct the patient to slowly lower back to the floor initiating the movement from above down, first touching the middle back, then the lower back, then the pelvis and finally the hip to the floor.
Have them repeat this exercise slowly 6-8 times trying to get them to feel that their hip, pelvis and spine can move independently from each other rather than as a block.
Have them repeat the exercise on the right side to re-educate 3 o’clock control. Instruct the patient to always start with the easiest side first
Retraining Exercise to Restore Symmetrical 12 to 6 o’clock
Patient is positioned supine with hips and knees flexed and feet hip width apart.
The patient palpates the ASISs with their fingers or thumbs to assess for symmetry of the ASISs in the frontal plane before they initiate movement. The therapist observes the ASISs and gives the patient verbal cues if needed to level the ASISs before movement is initiated. The most common initial instruction to the patient is to bring the R ASIS up superiorly in order for the ASISs to start from a position of symmetry before movement begins.
The patient is then instructed to inhale as they roll the pelvis down towards 6 o’clock attempting to keep the ASISs level by continuing to monitor with their fingers. If during the initial movement assessment it was found that the R ASIS moved farther inferiorly than the L ASIS the therapist instructs the patient to focus on pushing the L ASIS a little further inferiorly to keep the ASISs level in the frontal plane.
The patient is then instructed to exhale and roll the pelvis up towards 12 o’clock while still maintaining contact at the ASISs. If during the initial movement assessment it was found that the L ASIS moved farther superiorly than the R ASIS, the therapist instructs the patient to focus on drawing the R ASIS up further superiorly in order to keep the ASISs level. The patient repeats the movements toward 6 and 12 o’clock 6 to 8 times trying to maintain symmetry by continuing to monitor at the ASISs and making any adjustments as needed.
The goal is for the patient to be able to roll the pelvis towards 6 and 12 o’clock with symmetry of the ASISs maintained throughout the full range of motion and eventually without the patient having “to think” about maintaining this symmetry.
Dysfunctional Pelvic Clock Functional Movement Test
The pelvic clock gives the therapist a three dimensional assessment of the mobility as well as the neuromotor control of the lumbar spine and pelvis. It can be used to diagnose lumbar spine non-neutral as well as sacroiliac dysfunctions. The first goal for treatment and retraining is for the patient to be able to move the pelvis from 12 to 6 and from 6 to 12 symmetrically which can be observed and palpated by monitoring the position of the ASISs in the frontal plane. Once this is accomplished the next goal is for the patient to be able to rotate the pelvis from 3 to 9 and 9 to 3 with the ASISs remaining level in the frontal plane moving without effort and through symmetrical range of motion.
Anatomy and Biomechanical Considerations:
Sagittal plane range of motion in the lumbo-pelvic spine is observed when palpating the ASISs and asking the patient to roll the pelvis from 12 to 6 and 6 to 12 o’clock. When rolling the pelvis from 12 to 6 the lumbar spine facet joints need to be able to symmetrically move into extension, the sacral base needs to symmetrically anteriorly nutate and the innominates need to symmetrically anteriorly rotate in order for the ASISs to remain symmetrical throughout this movement. Rolling the pelvis from 6 to 12 requires the opposite symmetrical movements to occur.
Assessment of transverse plane motion and motor control can be observed by palpating the ASISs and asking the patient to roll the pelvis from 3 to 9 and from 9 to 3 o’clock. In order for the ASISs to remain level in the frontal plane there must be coordinated control of the abdominal obliques with the erector spinae and quadratus lumborum muscles.
Substitution Patterns to watch out for during retraining:
When retraining the patient for symmetrical sagittal plane movement towards 6 o’clock the most common dysfunctional pattern is for the patient to drive the R ASIS further inferiorly than the L due to hypertonicity of the R erector spinae and inhibition of the abdominals on the R side.
When retraining the patient for symmetrical sagittal plane movement towards 12 o’clock the most common substitution pattern is for the patient to pull the L ASIS further superiorly than the R for the same reasons as described above, ie hypertonic R erector spinae and inhibited R abdominals.
When retraining the patient for the transverse plane movements of 3 and 9 o’clock patients will most often substitute for a loss of transverse plane rotation by moving the pelvis in either the sagittal or frontal planes resulting in a palpable and observable deviation of the ASISs in the frontal plane. Initially the therapist should monitor the movement and give the patient verbal cues and sometimes manually assist the patient by gently lifting the pelvis on the side the patient is having difficulty lifting to insure the proper performance of this movement. Following the 3 and 9 o’clock movements with the hands also gives the therapist tactile feedback about how hard the patient is working to perform the movement. The patient then attempts to replicate this exercise at home by replacing the therapist’s manual contacts with their own thumbs or fingers at the ASISs.
Patients more often report pain in the back when attempting to perform the 9 to 3 and 3 to 9 o’clock movements than when moving from 12 to 6 because transverse plane rotation is more physically demanding and also results in compression of the spine.
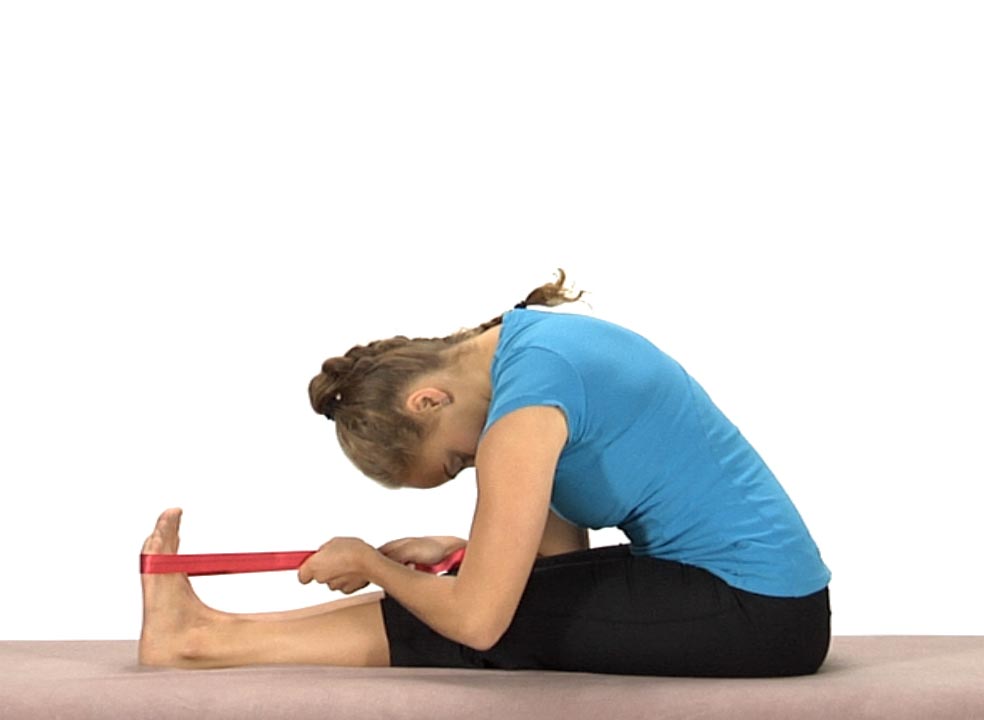
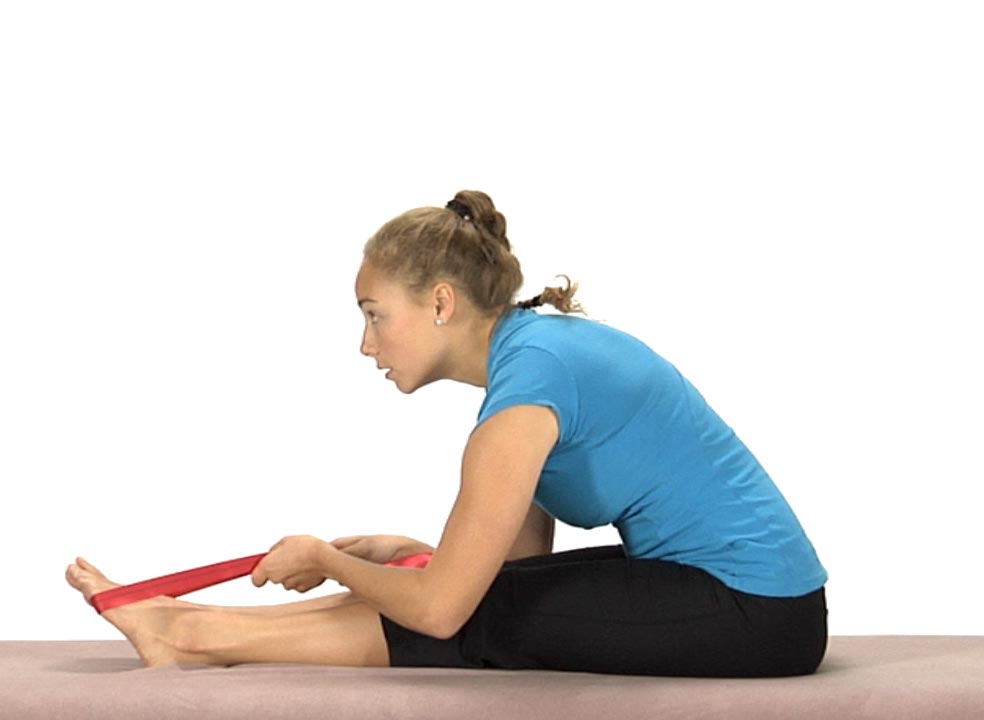
Have the patient in long sitting with a belt or towel wrapped around the balls of the feet.
Instruct the patient to keep their toes pointing down and their head up as they bring their trunk forward as far as possible.
Instruct the patient to use the belt/towel to pull their toes up as they lower the head. This places maximum stretch on their nervous system. This position is held only momentarily.
Then have them release the stretch by letting the toes point down as they lift their head back up and they attempt to increase their trunk flexion.
They repeat these movements back and forth 8-10 times.
After this stretch, always remember to instruct the patient to lie on their back with the knees up and perform 12:00 to 6:00 pelvic rocking 10 times to release any tension across their lower back.